태그 보관물: LLM

Code Interpreter를 사용하는 OpenAI Assistant

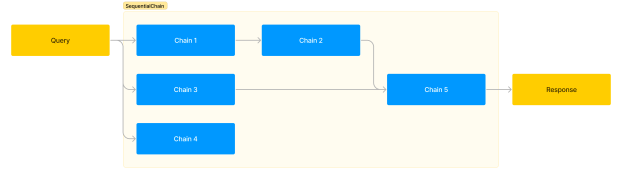
OpenAI Assistant에서 기본으로 제공하는 도구에는 Retrieval 도구와 Code Interpreter가 있습니다. 원하는 도구가 없을 때는 함수 호출 기능을 이용해 도구를 추가해줄 수도 있죠. 여기서는 Code Interpreter를 사용해 데이터를 분석해 보겠습니다.

분석할 데이터

Code Interpreter를 이용해 Titanic 자료를 분석해보겠습니다. 먼저 Titanic 데이터(titanic.csv)를 받습니다. 파일을 Code Interpreter에서 사용할 수 있도록 OpenAI 서버에 올립니다.

from openai import OpenAI
client = OpenAI(api_key="sk-")

my_file = client.files.create(
    file = open("titanic.csv",'rb'),
    purpose='assistants'
)
my_file

## 출력
FileObject(id='file-zS9GLj45Ff9b2daNSQLrVPSt', bytes=60302, created_at=1699803397, filename='titanic.csv', object='file', purpose='assistants', status='processed', status_details=None)

참고로, Code Interpreter에서는 csv 파일 외에도 text, pdf, docx, pptx, xlsx, csv, jpg, png, zip 등 다양한 파일을 읽을 수 있습니다.

Code Interpreter를 사용하는 Assistant

다음으로 Assistant를 생성하며 Code Interpreter를 Tool로 사용할 수 있도록 해줍니다.

assistant = client.beta.assistants.create(
  name="데이터 분석 전문가",
  description="당신은 데이터 분석 전문가입니다.",
  model="gpt-4-1106-preview",
  tools=[{"type": "code_interpreter"}]
)

이제 Assistant에게 내릴 명령을 준비해봅시다. Thread를 생성하며 Message를 이용해 명령을 내리는데, 이 때 앞에서 올린 파일을 메시지에 첨부해줍니다.

thread = client.beta.threads.create(
  messages=[
    {
      "role": "user",
      "content": "titanic.csv 파일에서 생존률에 영향을 미친 주요 요인 세 가지를 찾고 차트로 그려서 설명해주세요.",
      "file_ids": [my_file.id]
    }
  ]
)

명령 실행

명령을 실행할 수 있도록 Run 객체를 만들고 응답을 기다립니다.

import time

def run_and_wait(client, assistant, thread):
  run = client.beta.threads.runs.create(
    thread_id=thread.id,
    assistant_id=assistant.id
  )
  while True:
    run_check = client.beta.threads.runs.retrieve(
      thread_id=thread.id,
      run_id=run.id
    )
    print(run_check.status)
    if run_check.status in ['queued','in_progress']:
      time.sleep(2)
    else:
      break
  return run

run = run_and_wait(client, assistant, thread)

Code Interpreter는 내부적으로 여러 단계를 거쳐 최종 응답을 내놓습니다. 중간 단계들을 확인하고 싶으면 Run Steps를 확인하면 됩니다.

run_steps = client.beta.threads.runs.steps.list(
    thread_id=thread.id,
    run_id=run.id
)
len(run_steps.data) ## 출력: 9

총 9단계를 거쳐 답을 내놓았습니다. 중간 과정은 run_steps 객체 내부에 저장되어 있으니 필요하면 확인할 수 있습니다.

여기서는 Thread에 저장된 메시지들을 가져와 확인해보겠습니다.

thread_messages = client.beta.threads.messages.list(thread.id)
for i,msg in enumerate(thread_messages.data):
  print(len(msg.content))

## 출력
2
2
2
1
1
1

결과를 보면 총 6개의 메시지가 있고, 세 개의 메시지는 content가 한 개, 세 개는 content가 두 개 있습니다. 이 예제에서 content가 2인 경우는 그림을 포함하고 있는 경우입니다. 메시지를 출력해보죠.

Code Interpreter의 응답

결과 확인에 사용한 코드입니다.

from IPython.display import display, Image

for i,msg in enumerate(reversed(thread_messages.data)):
  for c in msg.content:
    if c.type == 'text':
      print(i, c.text.value + '\n')

    if c.type == 'image_file':
      api_response = client.files.with_raw_response.retrieve_content(c.image_file.file_id)
      if api_response.status_code == 200:
        content = api_response.content
        fimg = f'image_{i}.png'
        with open(fimg, 'wb') as f:
          f.write(content)
        img = Image(filename=fimg)
        display(img)

결과는 다음과 같습니다.

0 titanic.csv 파일에서 생존률에 영향을 미친 주요 요인 세 가지를 찾고 차트로 그려서 설명해주세요.

1 먼저 `titanic.csv` 파일을 읽어서 데이터를 살펴본 다음, 타이타닉호의 생존률에 영향을 미칠 수 있는 주요 요소에 대한 가설을 세워볼 것입니다. 생존률에 영향을 줄 것으로 예상되는 요소로는 일반적으로 성별(Sex), 객실 등급(Pclass), 그리고 나이(Age)가 자주 언급됩니다. 이러한 요소들에 대한 데이터를 분석하고 해당 요소들이 생존률에 어떤 영향을 미쳤는지 시각화하여 설명드리겠습니다.

먼저 데이터를 로드하고 초기 분석을 수행해 보겠습니다.

2 데이터셋에는 여러 컬럼들이 있는데, 여기서 생존률에 영향을 미쳤을 것으로 추정되는 주요 요인인 성별(`Sex`), 객실 등급(`Pclass`), 나이(`Age`)를 중점으로 살펴보겠습니다. 생존 여부는 `Survived` 컬럼에 표시되어 있으며, 생존한 경우 1, 그렇지 않은 경우 0의 값을 가지고 있습니다.

세 가지 요인에 대해 생존률을 비교하기 위해 다음과 같은 단계로 진행하겠습니다:

1. `Sex`: 성별에 따른 생존률 비교
2. `Pclass`: 객실 등급에 따른 생존률 비교
3. `Age`: 나이 범주(어린이, 성인, 노인 등)에 따른 생존률 비교

각각의 요인 별로 생존률을 계산하고 시각화하여 차트를 그리겠습니다. 차트는 각 요인에 따른 생존자 수 및 생존률을 보여줄 것입니다.

우선 성별에 따른 생존률을 분석해 보겠습니다.
3 성별에 따른 생존률 차트를 보면 여성의 생존률이 약 74.2%로, 남성의 생존률인 약 18.9%보다 훨씬 높다는 것을 알 수 있습니다. 이는 성별이 타이타닉호 생존률에 큰 영향을 미쳤음을 시사합니다.

그 다음으로는 객실 등급(`Pclass`)에 따른 생존률을 분석해 보겠습니다.
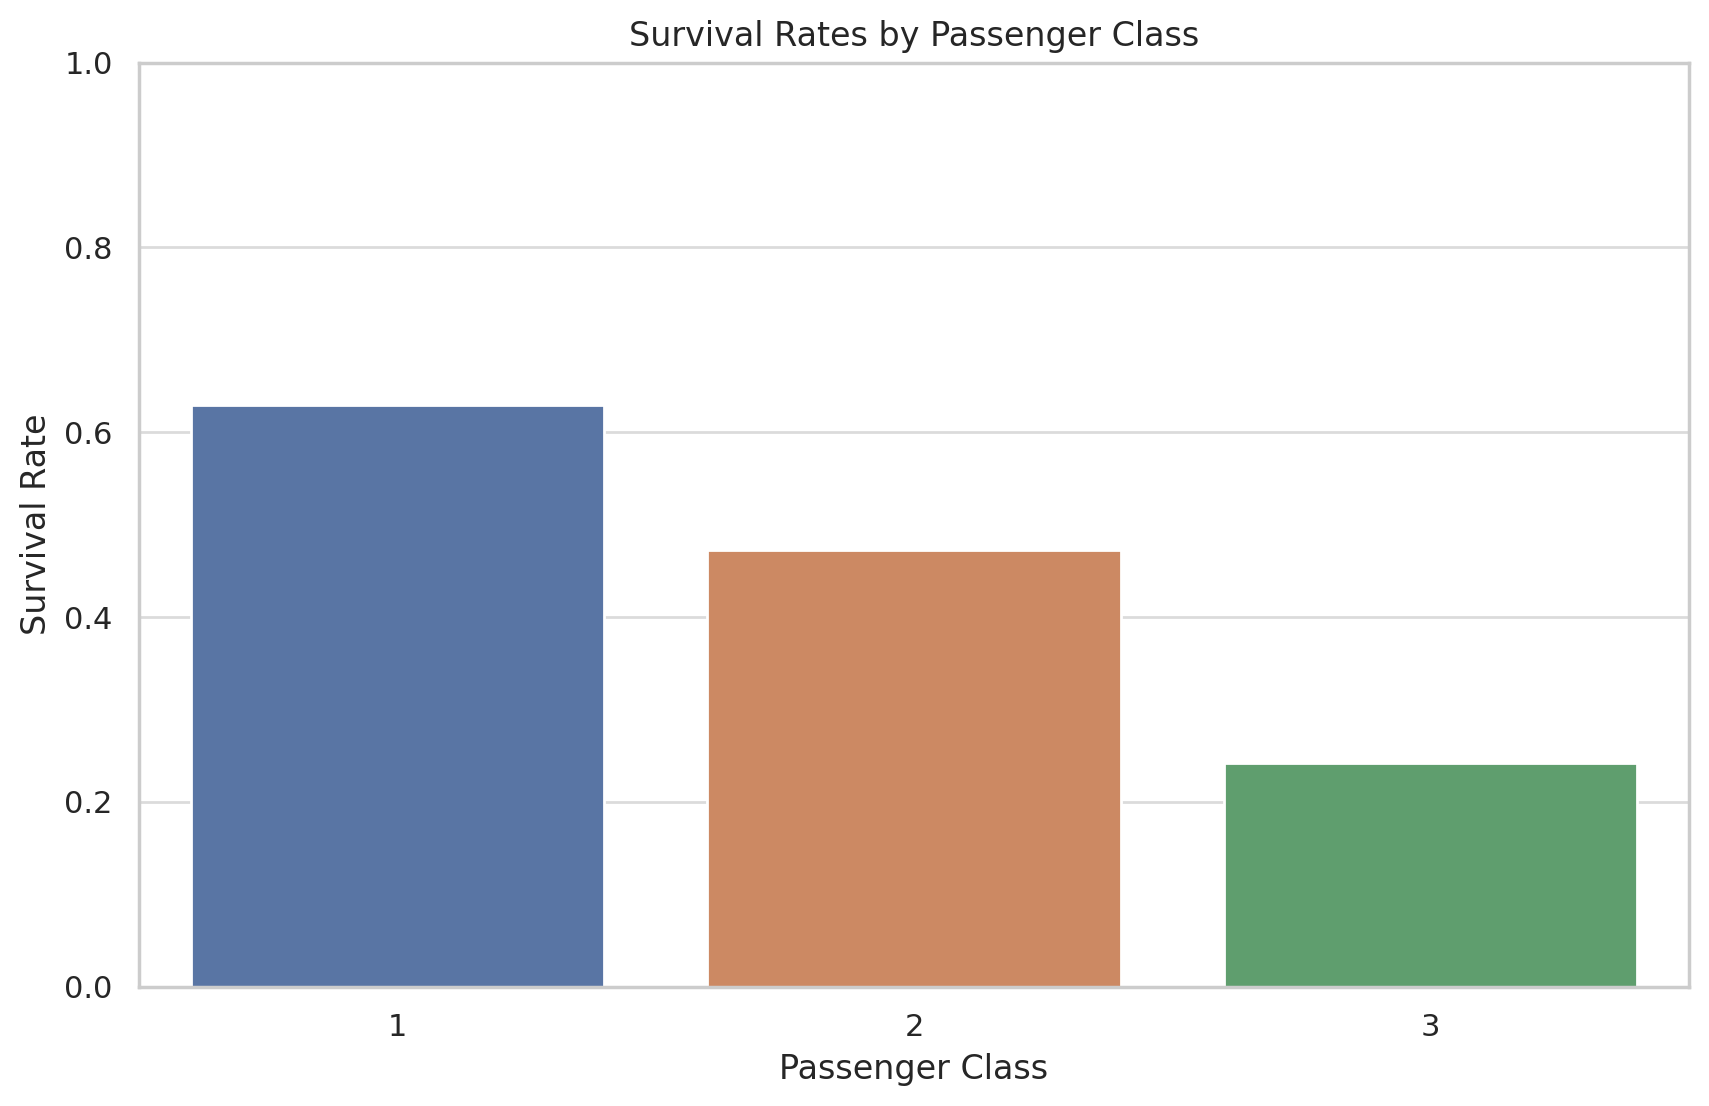
4 객실 등급(`Pclass`)별 생존률 차트에 따르면 1등급 객실 승객의 생존률이 약 62.96%로 가장 높고, 2등급은 약 47.28%, 3등급은 약 24.24%로 나타나고 있습니다. 이는 객실 등급이 생존률에 중요한 요인으로 작용했음을 보여줍니다. 1등급 객실 승객이 생존 가능성이 가장 높았고, 객실 등급이 낮을수록 생존 확률이 감소하는 경향을 볼 수 있습니다.

마지막으로 나이(`Age`) 범주별 생존률을 분석해 보겠습니다. `Age` 데이터에는 결측치가 있을 수 있으므로 이를 처리한 후 나이를 어린이(0-17), 성인(18-65), 노인(65+)의 세 범주로 나누어 생존률을 비교해 보겠습니다.
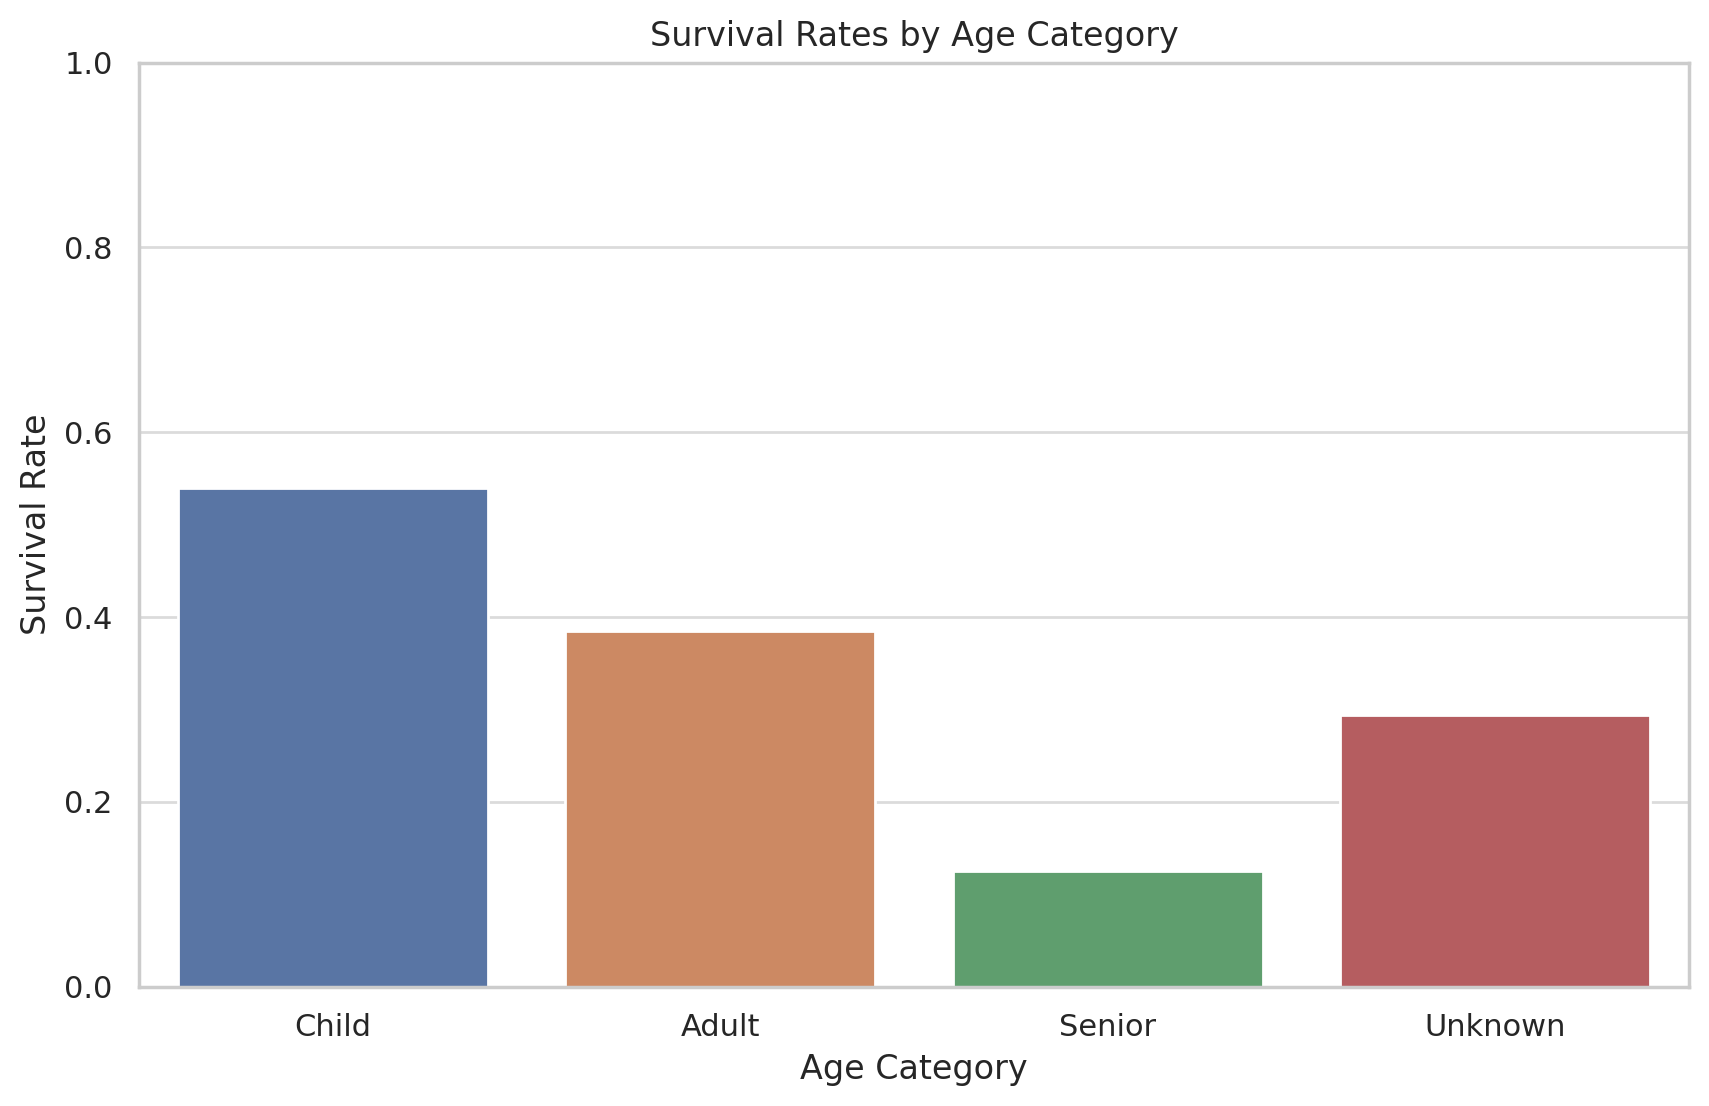
5 나이 범주별 생존률 차트를 보면 어린이(17세 이하)의 생존률이 약 53.98%로 가장 높고, 성인(18-65세)의 생존률은 약 38.45%, 노인(65세 이상)은 12.5%로 나타나고 있습니다. 나이를 알 수 없는 승객들(Unkown)의 생존률은 약 29.38%입니다. 이는 나이도 생존에 영향을 미친 요인이라 할 수 있으며, 특히 어린이의 생존률이 높게 나타나고 있습니다.

이상의 분석 결과를 종합해보면 타이타닉호에서의 생존률에 가장 큰 영향을 미친 요인 세 가지는 성별(`Sex`), 객실 등급(`Pclass`), 그리고 나이(`Age`)라는 결론이 도출됩니다.

- **성별**: 여성의 생존률이 남성에 비해 훨씬 높으며, 이는 당시 사회적인 구조와 구명 보트에 대한 여성과 어린이 우선 정책의 영향일 것으로 보입니다.
- **객실 등급**: 1등급 객실 승객의 생존률이 가장 높고, 객실 등급이 낮아질수록 생존률이 감소하는 경향을 보여줍니다. 구명 보트에 접근하는 데 있어서 1등급 승객이 더 우선적이었기 때문일 수 있습니다.
- **나이**: 어린이의 생존률이 가장 높고, 성인과 노인 순으로 낮아짐을 보여줍니다. 이는 어린이를 보호하려는 경향과 구명 보트 배정에 어린이를 우선시한 결과로 볼 수 있습니다.

각 요인의 차트는 상기 데이터와 결론을 시각적으로 보여주며, 이러한 요인들이 생존률에 영향을 미친 방식을 직관적으로 이해하는 데 도움을 줍니다.

저는 데이터에서 생존률에 영향을 미친 주요 요인 세 가지를 찾으라고 했는데, Code Interpreter는 이미 알고 있는 정보를 바탕으로 분석 결과를 보여줬네요. 데이터 분석은 잘 해서 보여줬습니다.

Assistant, Thread, File은 더 이상 사용하지 않으면 삭제해줍니다.

response = client.beta.threads.delete(thread.id)

response = client.beta.assistants.delete(assistant.id)

response = client.files.delete(my_file.id)

Code Interpreter 사용료

Code Interpreter는 세션당 $0.03 씩 과금합니다. 세션은 한 번 시작하면 한 시간동안 유효하고, 질문 횟수와는 무관합니다. 물론, 질문과 응답에 따르는 토큰 사용료는 별도입니다.

OpenAI Assistant를 이용한 Retrieval

앞에서 LangChain을 이용한 Retrieval Augmented Generation을 살펴봤습니다. OpenAI의 새로운 Assistant API를 이용하면 좀 더 쉽게 Retrieval을 구현할 수 있습니다.

구현 순서는 다음과 같습니다.

  1. Retrieval을 수행할 파일을 OpenAI 서버에 올리고 파일 ID를 저장합니다.
  2. Assistant를 생성합니다.
  3. Thread를 생성합니다.
  4. 파일을 포함하는 Message를 생성합니다. Message에는 파일의 내용과 관련된 질문을 넣습니다.
  5. Run 객체를 만들어 실행하면 파일에서 찾은 내용을 바탕으로 한 응답을 얻을 수 있습니다.

이 때 파일은 Message에 포함시킬 수도 있지만, Assistant에 포함시킬 수도 있습니다. Message는 Thread 생성 후에 만들 수도 있고, Thread를 생성하면서 동시에 만들 수도 있습니다. 최종 응답에는 파일의 어떤 내용을 참조했는지에 대한 정보도 포함되어 있습니다. 코드를 보겠습니다.

OpenAI 라이브러리

import openai
openai.__version__
# 결과: '1.2.3'

from openai import OpenAI
client = OpenAI(api_key="sk-")

파일 올리기

import requests

url="https://www.gutenberg.org/cache/epub/4/pg4.txt"
r = requests.get(url)

with open("GettysburgAddress.txt",'w') as fo:
  fo.write(r.text)

my_file = client.files.create(
    file = open("GettysburgAddress.txt",'rb'),
    purpose='assistants'
)
my_file

## 결과
FileObject(id='file-UdQTPO55auQ5CEEW562Ji9er', bytes=22030, created_at=1699803306, filename='GettysburgAddress.txt', object='file', purpose='assistants', status='processed', status_details=None)

구텐베르크 프로젝트 페이지에서 링컨의 게티스버그 연설을 받아서 파일로 저장하고 OpenAI 서버에 올렸습니다. 뒤에서 이 연설 내용에 관한 질문을 던지려고 합니다. 이 파일에는 게티스버그 연설문 앞 뒤로 프로젝트 소개, 안내와 같은 내용들도 들어 있습니다.

위 결과를 보면 파일 객체에 id가 있습니다. 파일 뿐 아니라 Assistant, Thread, Message, Run 객체 모두 id를 가지고 있씁니다. 앞으로 이 id를 이용해 각각의 객체들을 참조하게 됩니다.

Assistant, Thread, Message 생성

Retrieval을 위해서는 Assistant 생성시 tools에 retrieval 도구를 추가해줍니다.

assistant = client.beta.assistants.create(
  name="연설전문가",
  description="당신은 연설 전문가입니다.",
  model="gpt-4-1106-preview",
  tools=[{"type": "retrieval"}],
  #file_ids=[my_file.id]
)
assistant

## 결과
Assistant(id='asst_UojnLxCEe5wfEL0IZrHW43vu', created_at=1699803311, description='당신은 연설 전문가입니다.', file_ids=[], instructions=None, metadata={}, model='gpt-4-1106-preview', name='연설전문가', object='assistant', tools=[ToolRetrieval(type='retrieval')])

Assistant에 파일을 추가해주고 싶을 경우 위의 주석 처리한 file_ids 줄처럼 추가하면 됩니다.

이번엔 Thread를 생성하면서 Message도 추가해줬습니다. Message에 file_ids를 이용해 앞에서 올린 파일을 attach 했습니다.

thread = client.beta.threads.create(
  messages=[
    {
      "role": "user",
      "content": "링컨의 게티스버스 연설 내용을 한 문장으로 요약해주세요.",
      "file_ids": [my_file.id]
    }
  ]
)
thread

## 결과
Thread(id='thread_U4msr0xRagC356A7ZmYJB6sJ', created_at=1699803314, metadata={}, object='thread')

Run

Assistant와 Thread를 만든 후 Run을 실행해 응답을 받습니다. API를 이용해 Run 객체를 생성하면 LLM 모델이 응답을 생성할 때까지 기다리지 않고 바로 Run 객체를 반환하기 때문에 status를 확인해서 응답이 나올 때가지 기다립니다.

import time

def run_and_wait(client, assistant, thread):
  run = client.beta.threads.runs.create(
    thread_id=thread.id,
    assistant_id=assistant.id
  )
  while True:
    run_check = client.beta.threads.runs.retrieve(
      thread_id=thread.id,
      run_id=run.id
    )
    print(run_check.status)
    if run_check.status in ['queued','in_progress']:
      time.sleep(2)
    else:
      break
  return run

run_and_wait(client, assistant, thread)

## 결과
Run(id='run_FGObi8liSR7RhfodFQBFYFQ8', assistant_id='asst_UojnLxCEe5wfEL0IZrHW43vu', cancelled_at=None, completed_at=None, created_at=1699803317, expires_at=1699803917, failed_at=None, file_ids=[], instructions=None, last_error=None, metadata={}, model='gpt-4-1106-preview', object='thread.run', required_action=None, started_at=None, status='queued', thread_id='thread_U4msr0xRagC356A7ZmYJB6sJ', tools=[ToolAssistantToolsRetrieval(type='retrieval')])

결과 보기

응답은 Thread의 Message를 추출해 확인할 수 있습니다.

thread_messages = client.beta.threads.messages.list(thread.id)
for msg in thread_messages.data:
  print(f"{msg.role}: {msg.content[0].text.value}")

## 결과
assistant: 에이브러햄 링컨의 게티스버그 연설은 미국의 남북전쟁 중에 "전사들의 희생을 기리며, 자유를 위한 그들의 헌신이 헛되지 않았음을 다짐하고, '민주주의 정부가 이 땅에서 사라지지 않을 것'이라는 메시지를 전달한 것입니다【9†source】.
user: 링컨의 게티스버스 연설 내용을 한 문장으로 요약해주세요.

위의 결과를 보면 【9†source】 이런 참조 기호가 있습니다. 이건 Retrieval 도구에서 파일을 참조했다는 표시입니다. 파일의 어떤 내용을 참조했는지는 응답의 annotations에서 찾을 수 있습니다.

File Citation

응답에서 Annotations 부분에 어떤 내용이 있나 봅시다.

thread_messages.data[0].content[0].text.annotations

## 결과

[TextAnnotationFileCitation(end_index=130, file_citation=TextAnnotationFileCitationFileCitation(file_id='file-UdQTPO55auQ5CEEW562Ji9er', quote='Four score and seven years ago, our fathers brought forth\r\nupon this continent a new nation:  conceived in liberty, and\r\ndedicated to the proposition that all men are created equal.\r\n\r\nNow we are engaged in a great civil war. . .testing whether\r\nthat nation, or any nation so conceived and so dedicated. . .\r\ncan long endure.  We are met on a great battlefield of that war.\r\n\r\nWe have come to dedicate a portion of that field as a final resting place\r\nfor those who here gave their lives that this nation might live.\r\nIt is altogether fitting and proper that we should do this.\r\n\r\nBut, in a larger sense, we cannot dedicate. . .we cannot consecrate. . .\r\nwe cannot hallow this ground.  The brave men, living and dead,\r\nwho struggled here have consecrated it, far above our poor power\r\nto add or detract.  The world will little note, nor long remember,\r\nwhat we say here, but it can never forget what they did here.\r\n\r\nIt is for us the living, rather, to be dedicated here to the unfinished\r\nwork which they who fought here have thus far so nobly advanced.\r\nIt is rather for us to be here dedicated to the great task remaining\r\nbefore us. . .that from these honored dead we take increased devotion\r\nto that cause for which they gave the last full measure of devotion. . .\r\nthat we here highly resolve that these dead shall not have died in vain. . .\r\nthat this nation, under God, shall have a new birth of freedom. . .\r\nand that government of the people. . .by the people. . .for the people. . .\r\nshall not perish from this earth'), start_index=120, text='【9†source】', type='file_citation')]

위 내용을 보면 리스트 안에 TextAnnotationFileCitation 객체가 있고, text 항목에 인용 기호, quote에 인용한 내용이 있습니다. 인용 내용을 출력해봅시다.

print(thread_messages.data[0].content[0].text.annotations[0].file_citation.quote)

## 결과

Four score and seven years ago, our fathers brought forth
upon this continent a new nation:  conceived in liberty, and
dedicated to the proposition that all men are created equal.

Now we are engaged in a great civil war. . .testing whether
that nation, or any nation so conceived and so dedicated. . .
can long endure.  We are met on a great battlefield of that war.

We have come to dedicate a portion of that field as a final resting place
for those who here gave their lives that this nation might live.
It is altogether fitting and proper that we should do this.

But, in a larger sense, we cannot dedicate. . .we cannot consecrate. . .
we cannot hallow this ground.  The brave men, living and dead,
who struggled here have consecrated it, far above our poor power
to add or detract.  The world will little note, nor long remember,
what we say here, but it can never forget what they did here.

It is for us the living, rather, to be dedicated here to the unfinished
work which they who fought here have thus far so nobly advanced.
It is rather for us to be here dedicated to the great task remaining
before us. . .that from these honored dead we take increased devotion
to that cause for which they gave the last full measure of devotion. . .
that we here highly resolve that these dead shall not have died in vain. . .
that this nation, under God, shall have a new birth of freedom. . .
and that government of the people. . .by the people. . .for the people. . .
shall not perish from this earth

전체 문서 중에서 링컨 대통령의 연설 부분만 잘 추출해서 인용했습니다. 문서 생성시 LLM의 응답 메시지에서 위 text에 지정된 인용 기호 부분을 각주/미주 기호로 바꾸고 각주/미주 부분에 quote의 인용문을 넣으면 각주/미주를 만들 수 있습니다.

OpenAI RAG vs LangChain RAG

LangChain으로 RAG를 수행했을 때와 다른 부분을 생각해봅시다.

  • 문서를 벡터 데이터베이스에 넣고 검색하는 부분이 없습니다. OpenAI에서 알아서 짧은 문서는 텍스트 검색을 이용해 인용해주고, 긴 문서는 임베딩 벡터를 만들어 벡터 데이터베이스에 넣었다가 벡터 검색을 이용해 찾아서 인용해줍니다. 프로그래밍이 편해진 대신 임베딩 방법, 벡터 데이터베이스 종류와 검색 방법은 선택할 수 없습니다.
  • 길이 제한에 맞춰 이전 대화와 인용문을 프롬프트에 넣는 부분이 사라졌습니다. OpenAI에서 알아서 프롬프트 길이 제한에 맞춰줍니다. 역시 프로그래밍이 편해진 대신 이전 대화 내용과 인용문을 어떻게, 얼마나 줄여서 프롬프트에 넣을 것인지는 선택할 수 없습니다.

OpenAI Assistants API로 대화 내용 저장하기

OpenAI에서 11월 6일 새로운 API들을 발표했는데, 그 중 Assistants API가 있었습니다.

Assistants API의 Thread를 이용하면 LangChain에서 Memory를 이용해 대화 내용을 저장했던 것처럼 대화를 저장할 수 있습니다.

Assistants API의 Tools를 이용하면 LangChain Agent처럼 도구를 사용할 수 있습니다. 이전에도 함수 호출 기능이 있었지만, 이번 업데이트를 통해 Code Interpreter와 Retrieval 도구도 사용할 수 있게 되었습니다.

이 글에서는 Threads를 이용한 대화 저장 방법을 살펴보겠습니다.

Assistant, Thread, Message, and Run

먼저 API에서 사용하는 기본 용어들을 정리하겠습니다.

  • Assistant: 도구들을 사용할 수 있는 거대 언어 모델(GPT 모델들)입니다.
  • Thread: Message들을 저장하는 대화입니다.
  • Message: 대화에서 주고 받는 메시지들로, 텍스트 외에도 이미지나 파일을 포함할 수 있습니다.
  • Run: Assistant가 Thread에 저장된 Message들을 읽고 LLM의 응답 Message를 추가하는 과정입니다.
  • Run Step: Run을 실행할 때 단순히 LLM의 응답을 추가하는 경우도 있지만, 외부 도구들(Tools)을 사용한 후 결과를 이용해 응답하는 경우도 있습니다. 어떤 세부 단계를 거쳐 응답했는지 확인하고 싶을 때 Run Step을 이용합니다.

Run 상태

LLM에 질문을 던지면 응답을 받는데 시간이 걸립니다. 그래서 Run을 실행한다고 바로 Thread에 응답이 추가되지 않습니다. Run을 실행하면 queued → in_progress → completed 과정을 거쳐 응답이 생성됩니다. 만약 사용자가 제공한 Tool을 사용할 경우에는 사용자가 실행 결과를 다시 LLM에 제공해야 합니다. 이 때 결과를 기다리는 동안 Run은 requires_action 상태가 됩니다. 정리해보면,

  • 기본 응답: queued → in_progress → completed
  • Function calling 사용시: queued → in_progress → requires_action → (함수 호출 결과 입력 후 다시 Run) → queued → in_progress → completed
  • 응답 시간이 오래 걸리면: queued → in_progress → expired
  • 응답 실패시: queued → in_progress → failed
  • 사용자가 취소할 경우: queued → in_progress → (사용자가 취소) → cancelling → cancelled

따라서, Run 상태가 queued나 in_progress라면 응답을 얻기 위해 기다려야 합니다. 코드로 확인해보겠습니다.

Assistant 만들기

from openai import OpenAI
client = OpenAI(api_key="sk-")

assistant = client.beta.assistants.create(
  name="똑똑한 비서",
  description="당신은 똑똑한 비서입니다.",
  model="gpt-4-1106-preview"
)
assistant

## 출력
Assistant(id='asst_...', created_at=1699421567, description='당신은 똑똑한 비서입니다.', file_ids=[], instructions=None, metadata={}, model='gpt-4-1106-preview', name='똑똑한 비서', object='assistant', tools=[])

모델 이름이 “gpt-4-1106-preview”입니다. 아마 얼마 안 지나면 “gpt-4-turbo”로 바뀔 것입니다. API 호출 부분을 보면 beta가 들어가 있는데 이것도 얼마 안 있어 바뀌겠죠.

이렇게 생성한 assistant는 OpenAI의 서버에 저장되고, 고유한 id를 가지고 있습니다. 우리는 이 assistant를 id를 이용해 참조하게 됩니다.

Thread 만들기

thread = client.beta.threads.create(
  messages=[
    {
      "role": "user",
      "content": "링컨의 게티스버스 연설 내용을 한 문장으로 요약해주세요."
    }
  ]
)
thread

## 출력
Thread(id='thread_...', created_at=1699421567, metadata={}, object='thread')

Thread를 만들면서 Message도 넣었는데, Message는 나중에 따로 추가할 수도 있습니다. Assistant와 Thread를 만들었으니 이제 Run을 실행할 수 있습니다.

Run, 상태 확인

run = client.beta.threads.runs.create(
  thread_id=thread.id,
  assistant_id=assistant.id,
  #model="gpt-4-1106-preview",
  #instructions="additional instructions",
  #tools=[{"type": "code_interpreter"}, {"type": "retrieval"}]
)
run

## 출력
Run(id='run_...', assistant_id='asst_...', cancelled_at=None, completed_at=None, created_at=1699421567, expires_at=1699422167, failed_at=None, file_ids=[], instructions=None, last_error=None, metadata={}, model='gpt-4-1106-preview', object='thread.run', required_action=None, started_at=None, status='queued', thread_id='thread_...', tools=[])

Run을 생성하면서 Thread의 id와 Assistant의 id를 입력합니다. 필요할 경우 Assistant의 model, instruction, tools를 덮어쓸 수도 있습니다. 이렇게 Run을 생성하고 바로 내용을 확인해보면 status='queued'라고 나오는 것을 볼 수 있습니다. 바로 Thread를 확인해보면 응답이 아직 추가되어 있지 않으므로 Run 상태가 바뀌는 것을 확인한 후에 Thread의 Message를 확인해야 합니다.

import time

while True:
  run_check = client.beta.threads.runs.retrieve(
    thread_id=thread.id,
    run_id=run.id
  )
  if run_check.status in ['queued','in_progress']:
    time.sleep(2)
  else:
    break

Run 상태가 바뀌면 위 루프가 끝납니다. 이후에 Thread의 Message를 확인합니다.

Thread에 추가된 응답 Message 확인

thread_messages = client.beta.threads.messages.list(thread.id)
for msg in thread_messages.data:
  print(f"{msg.role}: {msg.content[0].text.value}")

## 출력
assistant: 링컨의 게티스버스 연설은 민주주의의 이상을 재확인하고, .....
user: 링컨의 게티스버스 연설 내용을 한 문장으로 요약해주세요.

이렇게 Assistant의 응답이 추가된 것을 확인할 수 있습니다. 이전의 대화 내용은 빼고 마지막 응답만 확인하고 싶다면 위 코드에서 list 함수 호출시 limit=1 옵션을 주면 됩니다.

새로운 메시지 추가

대화를 계속해 나가려면 Thread에 새로운 사용자 Message를 추가해주고 Run을 실행해서 Assistant Message를 확인하는 과정을 반복하면 됩니다. Thread에 새로운 Message를 추가하려면 Message를 생성하며 Thread id를 입력하면 됩니다.

new_message = client.beta.threads.messages.create(
  thread_id = thread.id,
  role="user",
  content="링컨은 어떤 사람이지?",
)
new_message

## 출력
ThreadMessage(id='msg_...', assistant_id=None, content=[MessageContentText(text=Text(annotations=[], value='링컨은 어떤 사람이지?'), type='text')], created_at=1699421965, file_ids=[], metadata={}, object='thread.message', role='user', run_id=None, thread_id='thread_...')

Run 반복

사용자 Message를 추가했으니 다시 Run을 실행해서 Assistant의 응답을 Thread에 추가합니다.

run = client.beta.threads.runs.create(
  thread_id=thread.id,
  assistant_id=assistant.id
)
while True:
  run_check = client.beta.threads.runs.retrieve(
    thread_id=thread.id,
    run_id=run.id
  )
  run_check
  if run_check.status not in ['queued','in_progress']:
    break
  else:
    time.sleep(2)

thread_messages = client.beta.threads.messages.list(thread.id)
for msg in thread_messages.data:
  print(f"{msg.role}: {msg.content[0].text.value}")

## 출력
assistant: 에이브러햄 링컨(Abraham Lincoln, 1809-1865)은 ...
user: 링컨은 어떤 사람이지?
assistant: 링컨의 게티스버스 연설은 ...
user: 링컨의 게티스버스 연설 내용을 한 문장으로 요약해주세요.

참고로, 이렇게 생성한 Assistant는 OpenAI Platform에서도 확인할 수 있습니다.

Assistant와 Thread 삭제

Assistant와 Thread는 OpenAI 서버에 저장되어 있는데, 더이상 필요가 없으면 삭제해줍니다.

# delete thread
response = client.beta.threads.delete(thread.id)
print(response)

# delete assistant
response = client.beta.assistants.delete(assistant.id)
print(response)

이 외에도 다양한 함수들이 있는데 API Reference를 확인하면 되겠습니다.

LangChain과 비교

LangChain에서는 Memory를 이용해 대화 내용을 저장했는데, 토큰 제한을 고려하여 최근 대화 내용만 남기거나 이전 대화 내용을 요약하는 등의 방식으로 분량을 줄였습니다. OpenAI API에서는 Thread를 통해 OpenAI 서버에 대화 내용을 저장해주고 토큰 제한에 맞추는 과정도 알아서 진행해주기 때문에 대화 진행이 간편해졌습니다.

대신 대화 내용 저장시 프로그래머가 컨트롤할 수 있는 부분은 별로 없습니다. 현재는 대화 내용을 최대한 보존하는 방식(토큰 소모가 많은 방식)인데, 앞으로 다른 방식을 사용할 수 있도록 옵션을 추가할 계획이라고 합니다.

LangChain: Tool들을 사용하는 Agent

인공지능 Agent는 사용자의 요청을 받은 후 어떤 기능을 어떤 순서로 실행할지 결정하는 역할을 합니다. Agent의 주요 특징들은 다음과 같습니다.

  • 목표(정책) 기반 행동: 주어진 목표를 달성하기 위해 행동합니다.
  • 자율성: 목표가 주어지면 자동으로 작동합니다.
  • 감지: 주변 환경에서 정보를 수집합니다.

Tools는 Agent가 할 수 있는 일에 해당합니다. 도구, 기술, 함수들이죠.

Agent의 작업 처리 순서도

Agent의 처리 흐름은 다음과 같습니다.

  1. Input: 사용자가 Agent에게 작업을 할당합니다.
  2. Thought: Agent가 작업을 완수하기 위해 무엇을 할지 생각합니다.
  3. Action/Action Input: 사용할 도구를 결정하고, 도구의 입력(함수의 입력값)을 결정합니다.
  4. Observation: 도구의 출력 결과를 관찰합니다.
  5. 관찰 결과 작업을 완료(Finish)했다는 판단에 도달할 때까지 2~4번 과정을 반복합니다.

위의 과정이 Agent의 작업 수행 과정인데, LangChain에서는 이 과정을 처리하는 객체를 Agent Executor라고 합니다.

LangChain Agent의 종류

LangChain에는 여러 종류의 Agent들이 있습니다. 몇 가지를 살펴보겠습니다.

  • Zero-shot ReAct: 작업과 도구 설명을 보고 사용할 도구를 결정합니다. ReAct는 Reasoning + Acting으로 Yao et al. (2022)의 논문에 소개된 개념입니다. Reasoning은 생각(Chain-of-Thought, COT), Acting은 외부 도구 실행을 의미합니다.
  • Structured input ReAct: input이 여러 개인 도구를 사용할 때 필요한 Agent입니다.
  • Conversational: 대화 + ReAct로 대화 저장을 위한 메모리가 필요합니다.
  • Self-ask with search: 인터넷 검색 후 답변하는 Agent로 검색 도구가 필요합니다.
  • ReAct document store: 문서 저장소 + ReAct로 문서 검색 도구가 필요합니다.

필요한 작업에 따라 정하면 되는데, Zero-shot ReAct가 가장 기본이 되는 Agent입니다.

LangChain Tools

LangChain Tools는 Agent가 수행하는 특정 기능으로, 외부 환경에 영향을 끼쳐 Agent가 새로운 정보를 관찰할 수 있도록 합니다. 도구를 추가할 때마다 LLM에 새로운 능력을 부여하는 셈이죠. 영화 매트릭스에서 트리니티가 순식간에 헬리콥터 조종 기술을 다운받는 것처럼 LLM에게도 순식간에 새로운 능력을 가르칠 수 있습니다. LangChain에는 미리 준비된 다양한 도구들이 존재하고, 필요하면 직접 도구를 만들어 쓸 수도 있습니다. LangChain의 기본 도구들을 몇 가지 살펴보겠습니다.

  • 일반적인 검색 도구: Google, Bing, DuckDuckGo
  • 특수 목적 검색 도구: Wolfram Alpha, Wikipedia, Youtube, Weather, News
  • 수학 계산: Math
  • 인터넷 RestAPI: Requests
  • 컴퓨터: Shell, Python REPL

이 외에도 여러 가지 도구들이 계속 추가되고 있습니다. 도구들 중에는 별도의 API 키가 필요한 도구도 있고, 무료로 사용할 수 있는 도구들도 있습니다. API 키가 필요한 도구들은 사용량에 따라 해당 서비스 제공자에게 사용료를 지불해야 할 수도 있습니다. 또한 도구들 중에는 실행을 위해 LLM이 필요한 도구도 있고 필요 없는 도구도 있습니다. LLM이 필요한 도구는 사용시 LLM을 지정해줘야 합니다.

예제: Math, Wikipedia

예제 코드를 보겠습니다.

!pip install langchain openai wikipedia

from langchain.chat_models import ChatOpenAI
from langchain.agents import load_tools, initialize_agent

llm = ChatOpenAI(temperature=0)
tools = load_tools(["llm-math","wikipedia"], llm=llm)
# llm-math 도구는 llm이 필요합니다.

agent= initialize_agent(
    tools,
    llm,
    agent='zero-shot-react-description',
    handle_parsing_errors=True,
    verbose = True)

# 수학 문제
agent("500의 20.5%는 몇인가요?")
# 결과: {'input': '500의 20.5%는 몇인가요?', 'output': '102.5'}

# wikipedia 검색 문제
question = "광안대교 길이는 몇 km인가요?"
result = agent(question)
# 결과: {'input': '광안대교 길이는 몇 km인가요?', 'output': 'The length of the Gwangan Bridge is 7,420 meters.'}

LangChain 내부 프롬프트들이 영어로 되어 있어서 응답 결과는 기본적으로 영어로 나옵니다. Wikipedia 도구는 Wikipedia에서 검색한 페이지의 내용을 모두 가져오는게 아니라 요약 부분만 가져오기 때문에 요약 부분에 원하는 내용이 없으면 질문에 대한 답을 못 찾을 수도 있습니다. 그럴땐 Python wikipedia 라이브러리를 이용해 페이지 전체를 받아서 답을 찾는 사용자 정의 도구를 만들거나 다른 검색 도구를 사용할 수 있습니다. 다음 예제에서 DuckDuckGo 검색엔진을 사용해봅시다.

예제: DuckDuckGo Search

! pip install duckduckgo-search

tools = load_tools(["ddg-search"])
agent= initialize_agent(
    tools,
    llm,
    agent='zero-shot-react-description',
    handle_parsing_errors=True,
    verbose = True)

result = agent(question)
# 결과: {'input': '광안대교 길이는 몇 km인가요?', 'output': 'The length of the Gwangan Bridge is 7.4 kilometers.'}

Google이나 Bing은 API Key가 필요하지만, DuckDuckGo는 API Key 없이 사용할 수 있는 검색엔진입니다.

예제: Youtube

이번엔 인터넷 검색에 유튜브 검색까지 같이 해봅시다.

! pip install youtube_search

from langchain.tools import YouTubeSearchTool
tools = load_tools(["ddg-search"]) + [YouTubeSearchTool()]

agent= initialize_agent(
    tools,
    llm,
    agent='zero-shot-react-description',
    handle_parsing_errors=True,
    verbose = True)

result = agent("이퀼리브리엄 영화에서 주인공이 저항군 아지트에서 들은 클래식 음악이 무엇인지 찾아서 유튜브 링크를 알려줘")

### 길지만 이해를 위해 중간 과정을 살펴 봅시다.
Entering new AgentExecutor chain...
- Thought: I need to find the name of the classical music heard by the protagonist in the movie "Equilibrium" and provide a YouTube link.
- Action: duckduckgo_search
- Action Input: "Equilibrium movie protagonist classical music"
- Observation: What classical music is played in the movie 'Equilibrium'? The character of Preston listens to Ludwig van Beethoven 's 9th Symphony, First Movement that he accidentally activates on the Victrola. If the audio is a recording of the actual song please check the replies to this comment to see if the bots u/RecognizeSong, u/songfinderbot and u/find-song identified it correctly :) (might take a few seconds to reply) . Please flair your post as Answered if the bots got it right, or comment to say if they listed the wrong song(s), so that people would know if help is still needed. What classical music is played in the movie 'Equilibrium'? The character of Preston listens to Ludwig van Beethoven's 9th Symphony, First Movement that he accidentally activates on the Victrola. What classical music is played in the movie 'Equilibrium'? The character of Preston listens to Ludwig van Beethoven's 9th Symphony, First Movement that he accidentally activates on the Victrola. Equilibrium hit theaters on Dec. 6, 2002, with a budget of $20 million. It only made $5 million back. That's despite a positive review from Roger Ebert, who praised the film's blend of ...
- Thought:I have found the name of the classical music heard in the movie "Equilibrium" and it is Ludwig van Beethoven's 9th Symphony, First Movement.
- Action: youtube_search
- Action Input: "Ludwig van Beethoven 9th Symphony First Movement,1"
- Observation: 'https://www.youtube.com/watch?v=VKxX2EJozxo&pp=ygUwTHVkd2lnIHZhbiBCZWV0aG92ZW4gOXRoIFN5bXBob255IEZpcnN0IE1vdmVtZW50'
- Thought:I now know the final answer.
- Final Answer: The classical music heard by the protagonist in the movie "Equilibrium" is Ludwig van Beethoven's 9th Symphony, First Movement. You can listen to it on YouTube at this link: [https://www.youtube.com/watch?v=VKxX2EJozxo&pp=ygUwTHVkd2lnIHZhbiBCZWV0aG92ZW4gOXRoIFN5bXBob255IEZpcnN0IE1vdmVtZW50]
- Finished chain.

# 최종 반환값입니다.
{'input': '이퀼리브리엄 영화에서 주인공이 저항군 아지트에서 들은 클래식 음악이 무엇인지 찾아서 유튜브 링크를 알려줘',
 'output': 'The classical music heard by the protagonist in the movie "Equilibrium" is Ludwig van Beethoven\'s 9th Symphony, First Movement. You can listen to it on YouTube at this link: [https://www.youtube.com/watch?v=VKxX2EJozxo&pp=ygUwTHVkd2lnIHZhbiBCZWV0aG92ZW4gOXRoIFN5bXBob255IEZpcnN0IE1vdmVtZW50]'}

앞에 나온 순서도의 중간 과정을 두 번 반복했습니다. 먼저 DuckDuckGo 검색을 사용하고 그 결과를 이용해 두 번째에는 Youtube 검색으로 최종 결과를 얻었습니다. 만약 Youtube 링크가 주어졌을 때 영상을 틀어주는 도구를 추가한다면 바로 음악을 틀어달라고 요청할 수도 있겠죠? 이번엔 사용자 지정 도구를 만들어 봅시다.

예제: 사용자 도구 만들기

사용자 도구는 LangChain의 tool 데코레이터로 함수를 꾸며주면 됩니다. 함수 설명 문자열에 함수의 기능과 입력 인자 정보를 넣어야 Agent에서 해당 내용을 보고 어떤 도구인지, 어떻게 사용하는지 알 수 있습니다. OpenAI API의 Function Call에서 함수와 인자의 description에 해당하는 부분이죠. LLM이 사용하는 도구이므로 함수의 입력과 출력은 모두 문자열로 해줍니다.

from langchain.agents import tool
from datetime import date

@tool
def date_today(text):
  """오늘 날짜 반환, input은 ''"""
  return str(date.today())

agent= initialize_agent(
    [date_today],
    llm,
    agent='zero-shot-react-description',
    handle_parsing_errors=True,
    verbose = True)

agent("오늘 날짜는?")
{'input': '오늘 날짜는?', 'output': '오늘 날짜는 2023-10-26입니다.'}

이렇게 OpenAI API의 함수 호출 기능에 비해 비교적 간단히 LLM에게 새로운 기능을 추가해줄 수 있습니다.

LangChain 긴 문서 다루기: Stuff, Refine, Map Reduce, Map Re-rank

LangChain에서 document loader를 이용해 문서를 읽어들인 후 text splitter를 이용해 긴 문서를 chunk들로 나누었습니다. 그 다음엔 분할한 문서들로 요약이나 질의응답(QA)과 같은 LLM 작업을 수행해야겠죠? 문서를 이용해 LLM 작업을 수행하는 방법들에 대해 알아보겠습니다.

Stuff

먼저 Stuff 방법입니다. 이 방법은 분할할 필요가 없는 짧은 문서 전체를 프롬프트에 넣어 LLM에 전달하는 방법입니다. 간단하고 API를 한 번만 호출하면 되지만, 문서 길이가 길어지면 사용할 수 없는 방법입니다.

Refine

Refine 방법을 이용해 4개의 chunk로 나눠진 문서를 요약하는 과정을 생각해봅시다.

  • 우선 1번 chunk를 요약합니다.
  • 1번 요약에 2번 chunk를 더한 내용을 요약합니다.
  • 1+2번 요약에 3번 chunk를 더한 내용을 요약합니다.
  • 1+2+3번 요약에 4번 chunk를 더한 내용을 요약합니다. 이 내용이 최종 결과가 됩니다.

이 방법은 문서의 맥락을 유지하며 긴 문서를 요약할 수 있는 방법이지만, Stuff 방법에 비하면 API 호출 횟수가 많습니다. 또한 LLM을 순차적으로 호출해야 하므로 전체 작업 시간이 길어지게 됩니다.

Map Reduce

Map Reduce 방법을 이용해 4개의 chunk로 나눠진 문서를 요약하는 과정을 생각해봅시다.

  • 1번부터 4번 chunk를 각각 요약합니다.
  • 4개의 요약 내용을 합해서 다시 요약합니다. 이 내용이 최종 결과가 됩니다.

이 방법은 각 Chunk를 요약할 때 병렬로 요약할 수 있기 때문에 Refine 방법보다 빠르지만 Reduce 과정 포함하므로 API 호출 횟수가 더 많아집니다.

Map Re-rank

Map Re-rank 방법을 이용해 4개의 chunk로 나눈 문서에서 질문에 대한 답을 찾는 과정을 생각해봅시다.

  • 1번부터 4번까지의 Chunk에서 각각 답을 찾습니다. 이 때 답에 대해 확신하는 정도를 점수로 나타냅니다.
  • 확신 점수가 가장 높은 답을 결과로 채택합니다.

이 방법은 Map Reduce 방법에 비하면 API 호출 횟수가 적지만, 몇 개의 Chunk에 걸쳐 답에 관한 정보가 나눠져 있을 경우 이 정보들을 조합해서 답을 찾을 수는 없습니다.

Map Re-rank vs VectorDB

벡터 데이터베이스에서는 문서 Chunk들의 임베딩 벡터와 질문의 임베딩 벡터 사이의 코사인 거리를 이용해 질문과 의미가 가까운 내용을 찾았습니다. 이 방법도 일종의 점수를 매기는 방법이라고 할 수 있겠죠. 그럼 Map Re-rank와 벡터 임베딩을 이용하는 방법은 어떤 차이가 있을까요?

벡터 임베딩을 이용하는 경우에는 벡터 거리를 이용하므로 글의 의미가 질문과 얼마나 가까운지만 고려합니다. 반면에, Map Re-rank 방법은 의미 뿐 아니라 글의 품질과 같은 요소도 고려할 수 있습니다. 따라서 벡터 임베딩과 함께 사용하면 벡터 임베딩 기법을 보완할 수 있는 방법이라고 할 수 있습니다.

LangChain: MarkdownHeaderTextSplitter로 마크다운 문서 나누기

LangChain에서 Document loader로 읽어들인 문서의 텍스트를 적절한 길이의 chunk로 분할할 때Text splitter를 사용합니다. 지정한 문자들로 텍스트를 자르는 RecursiveCharacterTextSplitter에 이어 MarkdownHeaderTextSplitter에 대해 살펴보겠습니다.

MarkdownHeaderTextSplitter

MarkdownHeaderTextSplitter에서는 Markdown 파일에서 사용하는 #, ##, ### 등의 헤더를 기준으로 Markdown 텍스트를 분할합니다. 예제 코드를 보겠습니다.

간단한 마크다운 문자열이 있습니다.

md = """
# Title

## Chapter 1

### Sub1
content 1-1

### Sub2
content 1-2

## Chapter 2
content 2-0

## Chapter 3

### Sub1
content 3-1

### Sub2
content 3-2
"""

1단계 #, 2단계 ##, 3단계 ###까지 헤더를 사용한 문자열입니다. MarkdownHeaderTextSplitter로 분할해보겠습니다.

from langchain.text_splitter import MarkdownHeaderTextSplitter

headers_to_split_on = [
    ("#", "Header 1"),
    ("##", "Header 2"),
    ("###", "Header 3")
]

markdown_splitter = MarkdownHeaderTextSplitter(headers_to_split_on = headers_to_split_on)
md_header_splits = markdown_splitter.split_text(md)
md_header_splits

## 출력
[Document(page_content='content 1-1', metadata={'Header 1': 'Title', 'Header 2': 'Chapter 1', 'Header 3': 'Sub1'}),
 Document(page_content='content 1-2', metadata={'Header 1': 'Title', 'Header 2': 'Chapter 1', 'Header 3': 'Sub2'}),
 Document(page_content='content 2-0', metadata={'Header 1': 'Title', 'Header 2': 'Chapter 2'}),
 Document(page_content='content 3-1', metadata={'Header 1': 'Title', 'Header 2': 'Chapter 3', 'Header 3': 'Sub1'}),
 Document(page_content='content 3-2', metadata={'Header 1': 'Title', 'Header 2': 'Chapter 3', 'Header 3': 'Sub2'})]

위에서 headers_to_split_on을 이용해 어떤 헤더(#, ##, ###)를 기준으로 분할할지, 분할한 헤더의 이름(Header 1, Header 2, Header 3)을 무엇으로 할지 지정해줍니다. 분할한 헤더의 이름은 결과로 나온 Document 객체의 metadata에 들어갑니다. 출력 결과를 보면 지정해준 1, 2, 3단계 헤더들을 기준으로 문서를 분할한 것을 알 수 있습니다.

이번엔 2단계 헤더까지만 사용해보겠습니다.

headers_to_split_on = [
    ("#", "Header 1"),
    ("##", "Header 2")
]

markdown_splitter = MarkdownHeaderTextSplitter(headers_to_split_on = headers_to_split_on)
md_header_splits = markdown_splitter.split_text(md)
md_header_splits

## 출력
[Document(page_content='### Sub1\ncontent 1-1  \n### Sub2\ncontent 1-2', metadata={'Header 1': 'Title', 'Header 2': 'Chapter 1'}),
 Document(page_content='content 2-0', metadata={'Header 1': 'Title', 'Header 2': 'Chapter 2'}),
 Document(page_content='### Sub1\ncontent 3-1  \n### Sub2\ncontent 3-2', metadata={'Header 1': 'Title', 'Header 2': 'Chapter 3'})]

결과를 보면 2단계 헤더까지만 이용해 텍스트가 나눠지고, 3단계 헤더는 page_content에 들어가 있는 것을 확인할 수 있습니다.

앞에서 봤던 RecursiveCharacterTextSplitter 또는 다른 Text splitter와 달리, 길이를 기준으로 나누는 것이 아니라 헤더를 기준으로 나누기 때문에 길이가 매우 긴 Document가 나올 수 있습니다.

MarkdownHeaderTextSplitter와 유사한 Text splitter로 HTMLHeaderTextSplitter가 있습니다. HTMLHeaderTextSplitter는 HTML 헤더를 이용해 HTML 파일을 분할합니다.

LangChain: RecursiveCharacterTextSplitter로 긴 글 자르기

LangChain에서 Document loader를 이용해 문서를 읽어들인 후 문서가 길면 LLM에서 소화할 수 있도록 chunk로 분할해야 합니다. 이런 작업을 해주는 클래스들이 langchain.text_splitter 모듈에 들어 있습니다. 해당 모듈에는 다양한 클래스들이 있고, 계속 추가되고 있습니다. 몇 가지만 적어보겠습니다.

Text Splitter

  • CharacterTextSplitter: 특정 문자를 이용해 문자열을 나눕니다.
  • RecursiveCharacterTextSplitter: 아래에서 자세히 살펴보겠습니다.
  • MarkdownHeaderTextSplitter: 마크다운 파일의 헤더를 기준으로 나눕니다.
  • HTMLHeaderTextSplitter: HTML 파일의 헤더를 기준으로 나눕니다.
  • TokenTextSplitter: 토큰 수를 기준으로 나눕니다. OpenAI의 tiktoken을 이용합니다.

RecursiveCharacterTextSplitter

RecursiveCharacterTextSplitter는 지정한 chunk_size 이하가 되도록 문자열을 자르는데, 기본적으로 ["\n\n", "\n", " ", ""]와 같은 문자를 이용해 자릅니다. 순서대로 가장 먼저 “\n\n”으로 자르고, 그래도 chunk_size 보다 긴 chunk는 “\n”으로 자르고, 그래도 길면 ” “로 자르는 방식으로 chunk를 만듭니다. 단순히 글자수로 자르는 것에 비해 문단, 문장, 단어 등으로 자르기 때문에 글의 의미를 보존하는데 좋은 방법이라 할 수 있습니다.

구분 문자(separators)는 원하는 문자들의 리스트로 바꿀 수 있습니다. chunk_size를 계산하는 함수는 기본적으로 len인데, 토크나이저를 지정해서 토큰 수로 chunk_size를 계산할 수도 있습니다. 정규표현식을 이용해 나누는 것도 가능합니다.

예제를 살펴보겠습니다. 프로젝트 구텐베르그 사이트에서 명상록 텍스트 파일을 받아 파일로 저장했습니다.

import requests
url = "https://www.gutenberg.org/cache/epub/2680/pg2680.txt"
response = requests.get(url)

with open("Meditations_pg.txt",'wb') as fh:
    fh.write(response.content)

다음엔 Document loader 중 텍스트 파일을 읽는데 사용하는 TextLoader를 이용해 앞에서 쓴 텍스트 파일을 읽습니다.

from langchain.document_loaders import TextLoader

loader = TextLoader("Meditations_pg.txt")
data = loader.load()

data는 Document 자료형의 원소를 하나 가진 리스트입니다.

len(data[0].page_content) # 417445

길이가 길기 때문에 LLM에 그대로 입력으로 쓸 수는 없습니다. 분할해봅시다.

from langchain.text_splitter import RecursiveCharacterTextSplitter
text_splitter = RecursiveCharacterTextSplitter(
    chunk_size = 1000,
    chunk_overlap  = 50,
    length_function = len,
    is_separator_regex = False,
)
texts = text_splitter.split_documents(data)

한 chunk의 길이가 1000자 이내가 되도록 나눴습니다.

len(texts) # 595
type(texts) # list

texts[0]
## 결과
Document(page_content='\ufeffThe Project Gutenberg eBook of Meditations\n    \nThis ebook is for the use of anyone anywhere in the United States and\nmost other parts of the world at no cost and with almost no restrictions\nwhatsoever. You may copy it, give it away or re-use it under the terms\nof the Project Gutenberg License included with this ebook or online\nat www.gutenberg.org. If you are not located in the United States,\nyou will have to check the laws of the country where you are located\nbefore using this eBook.\n\nTitle: Meditations\n\n\nAuthor: Emperor of Rome Marcus Aurelius\n\nRelease date: June 1, 2001 [eBook #2680]\n                Most recently updated: March 9, 2021\n\nLanguage: English\n\n\n\n*** START OF THE PROJECT GUTENBERG EBOOK MEDITATIONS ***\n\n\n\nMEDITATIONS\n\nBy Marcus Aurelius\n\n\n\n\nCONTENTS\n\n\n     NOTES\n\n     INTRODUCTION\n\n     FIRST BOOK\n\n     SECOND BOOK\n\n     THIRD BOOK\n\n     FOURTH BOOK\n\n     FIFTH BOOK\n\n     SIXTH BOOK\n\n     SEVENTH BOOK\n\n     EIGHTH BOOK\n\n     NINTH BOOK\n\n     TENTH BOOK', metadata={'source': 'Meditations_pg.txt'})

이렇게 split_documents를 이용하면 Document로 구성된 리스트를 분할할 수 있습니다. 문자열로 구성된 리스트를 분할하고 싶다면 create_documents를, 그냥 문자열을 분할하고 싶다면 split_text 메소드를 이용하면 됩니다.

with open("Meditations_pg.txt",'r') as fh:
    txt = fh.read()
texts2 = text_splitter.create_documents([txt])

len(texts2) # 595
type(texts2) # list

texts2[10]
## 출력
Document(page_content='from him, and he was assassinated. Marcus now went to the east, and\nwhile there the murderers brought the head of Cassius to him; but the\nemperor indignantly refused their gift, nor would he admit the men to\nhis presence.')

create_documents의 결과도 Document 자료형의 리스트로 나오는 것을 볼 수 있습니다. 반면에, split_text를 이용해 문자열을 분할하면 그냥 문자열의 리스트가 나옵니다.

texts3 = text_splitter.split_text(txt)

len(texts3) # 595
type(texts3) # list

texts3[10]
## 출력
'from him, and he was assassinated. Marcus now went to the east, and\nwhile there the murderers brought the head of Cassius to him; but the\nemperor indignantly refused their gift, nor would he admit the men to\nhis presence.'

LangChain: 조건문처럼 쓸 수 있는 RouterChain

라우터는 네트워크 중계장치로, 여러 통신망들 중 최적의 경로(route)를 지정해주는 장비입니다. RouterChain은 라우터처럼 입력 query와 목적지 Chain들의 정보를 분석하여 최적의 Chain으로 연결해주는 Chain입니다.

몇 가지 개념들을 살펴봅시다.

  • destination_chains: RouterChain 다음 단계로 연결될 수 있는 목적지 Chain들로, 각각의 destination chain은 LLMChain이나 다른 복합적인 Chain으로 만듭니다.
  • default_chain: 입력 query를 보낼만한 적합한 destination chain이 없을 때 연결하는 Chain입니다.
  • RouterChain: destination_chains 정보와 입력 query를 비교하여 가장 적합한 Chain을 선택합니다. 적절한 Chain이 없으면 default chain을 선택합니다.
  • RouterOutputParser: RouterChain의 출력 문자열을 다음 Chain에서 입력으로 사용할 수 있도록 딕셔너리로 바꿔줍니다. 딕셔너리는 목적지 Chain 정보와 목적지 Chain의 입력 프롬프트 정보를 포함합니다.

Destination Chains

코드를 봅시다. 예제를 위해 철학, 물리학, 컴퓨터, 문학 네 분야의 전문가들을 모셨습니다.

philosophy_expert = """
당신은 플라톤입니다. 철학 전문가입니다. 모르는 질문에는 모른다고 답합니다.
질문: {input}
"""
physics_expert = """
당신은 아인슈타인입니다. 물리학 전문가입니다. 모르는 질문에는 모른다고 답합니다.
질문: {input}
"""
computer_expert = """
당신은 폰 노이만입니다. 컴퓨터 전문가입니다. 모르는 질문에는 모른다고 답합니다.
질문: {input}
"""
literature_expert = """
당신은 셰익스피어입니다. 문학 전문가입니다. 모르는 질문에는 모른다고 답합니다.
질문: {input}
"""

위의 문자열들은 목적지 Chain들의 프롬프트 템플릿으로 사용할겁니다.

prompt_info = [
    {
        "name":"philosophy",
        "description": "철학 관련 질문에 대답",
        "prompt_template": philosophy_expert
    },
    {
        "name":"physics",
        "description": "물리학 관련 질문에 대답",
        "prompt_template": physics_expert
    },
    {
        "name":"computer",
        "description": "컴퓨터 관련 질문에 대답",
        "prompt_template": computer_expert
    },
    {
        "name":"literature",
        "description": "문학 관련 질문에 대답",
        "prompt_template": literature_expert
    }
]

위 리스트에는 목적지 Chain들의 정보를 담았습니다. 각 Chain 정보는 딕셔너리로, name, description, prompt_template을 포함하고 있습니다. 목적지 Chain들에서 사용할 LLM을 정의하겠습니다.

from langchain.chat_models import ChatOpenAI
from langchain.prompts import ChatPromptTemplate
from langchain.chains import LLMChain

llm = ChatOpenAI(temperature=0)

이제 목적지 Chain들을 만들며 {“name”:Chain} 형태의 딕셔너리를 준비합니다. RouterChain에서 목적지 Chain의 이름을 지정해주면 해당 Chain으로 연결하기 위한 사전작업입니다.

destination_chains = {}
for p in prompt_info:
    name = p["name"]
    prompt = ChatPromptTemplate.from_template(template=p["prompt_template"])
    destination_chains[name] = LLMChain(llm=llm, prompt=prompt)

RouterChain의 프롬프트에 넣을 목적지 Chain들의 정보를 준비합니다. 간단하게 “name”: “description” 형태의 문자열을 만들었습니다.

destinations = [f"{p['name']}: {p['description']}" for p in prompt_info]
destinations_str = "\n".join(destinations)
print(destinations_str)

### 결과
philosophy: 철학 관련 질문에 대답
physics: 물리학 관련 질문에 대답
computer: 컴퓨터 관련 질문에 대답
literature: 문학 관련 질문에 대답

Default Chain

적절한 목적지 Chain이 없을 때 사용할 Default Chain도 준비합니다. 사용자 입력을 그대로 넘기도록 했습니다.

default_prompt = ChatPromptTemplate.from_template("{input}")
default_chain = LLMChain(llm=llm, prompt=default_prompt)

RouterChain

RouterChain을 만드는데 필요한 클래스들을 import 하겠습니다.

from langchain.chains.router import MultiPromptChain
from langchain.chains.router.llm_router import LLMRouterChain,RouterOutputParser
from langchain.prompts import PromptTemplate

이제 RouterChain의 프롬프트를 준비합시다.

MULTI_PROMPT_ROUTER_TEMPLATE = """
입력받은 내용을 바탕으로 가장 적절한 모델 프롬프트를 선택하세요.
모델 프롬프트 정보는 다음과 같이 주어집니다.

"프롬프트 이름": "프롬프트 설명"

<< FORMATTING >>
Return a markdown code snippet with a JSON object formatted to look like:
```json
{{{{
    "destination": string \ name of the prompt to use or "DEFAULT"
    "next_inputs": string \ a potentially modified version of the original input
}}}}
```

REMEMBER: "destination"은 아래 주어진 프롬프트 설명을 바탕으로 프롬프트 이름 중 하나를 선택하거나,
적절한 프롬프트가 없으면 "DEFAULT"를 선택할 수 있습니다.

REMEMBER: "next_inputs"은 원본 INPUT을 넣으세요.

<< CANDIDATE PROMPTS >>
{destinations}

<< INPUT >>
{{input}}

<< OUTPUT (remember to include the ```json)>>"""

router_template = MULTI_PROMPT_ROUTER_TEMPLATE.format(
    destinations=destinations_str
)

위에서 MULTI_PROMPT_ROUTER_TEMPLATE는 기본 문자열입니다. format을 거치며 destinations만 치환하고 input은 남기기 위해 input에 중괄호를 두 개 사용했습니다. 하나만 쓰면 치환할 때 input 정보도 넣으라고 에러가 납니다. json은 치환하지 않을 것이기 때문에 중괄호를 중복해서 썼습니다. format을 거치면 {{{로 바뀌는데 여기서 한 번, 뒤에서 PromptTemplate에서 또 한 번 치환이 일어나므로 json의 중괄호를 끝까지 남겨두기 위해 중괄호를 네 개 썼습니다.

이제 RouterChain의 PromptTemplate과 RouterChain을 만들 차례입니다.

router_prompt = PromptTemplate(
    template=router_template,
    input_variables=["input"],
    output_parser=RouterOutputParser(),
)

router_chain = LLMRouterChain.from_llm(llm, router_prompt)

MultiPromptChain

다음에는 RouterChain, 목적지 Chain, Default Chain을 모두 묶어서 MultiPromptChain을 만듭니다.

chain = MultiPromptChain(router_chain=router_chain, 
                         destination_chains=destination_chains, 
                         default_chain=default_chain,
                         verbose=True
                        )

중간에 어떤 목적지 Chain을 선택했는지 확인하기 위해 verbose=True로 입력했습니다. 이제 준비가 끝났습니다. 호출해볼까요?

Run

chain.run("상대성 이론이 뭐에요?")

### 결과
> Entering new MultiPromptChain chain...
physics: {'input': '상대성 이론이 뭐에요?'}
> Finished chain.
'상대성 이론은 알버트 아인슈타인이 제시한 물리학 이론으로, 시간, 공간, 그리고 중력에 대한 새로운 이해를 제공합니다. 이론은 두 가지 주요한 부분으로 나뉩니다. 첫 번째는 특수 상대성 이론으로, 서로 다른 관측자들이 서로 다른 속도로 움직이더라도 물리적 법칙은 동일하게 적용된다는 것을 설명합니다. 두 번째는 일반 상대성 이론으로, 중력을 공간과 시간의 곡률로 설명하며, 질량이나 에너지가 공간과 시간을 구부리는 것을 설명합니다. 이론은 많은 실험적 검증을 거쳐 현대 물리학의 기초로 자리잡았습니다.'

목적지 Chain으로 물리학 Chain이 선택되며 아인슈타인에게 질문이 전달된 것을 볼 수 있습니다.

chain.run("삶의 의미는?")

### 결과
> Entering new MultiPromptChain chain...
philosophy: {'input': '삶의 의미는?'}
> Finished chain.
'플라톤: 삶의 의미는 인간의 존재와 관련된 복잡한 주제입니다. 제가 생각하기에 삶의 의미는 개인에 따라 다를 수 있으며, 각각의 사람들은 자신만의 의미를 발견하고 이해해야 합니다. 삶의 의미는 인간의 가치, 목적, 성장, 연결, 창조 등 다양한 측면을 포함할 수 있습니다. 그러나 이 질문에 대한 절대적인 답은 없으며, 이는 개인의 철학적, 종교적, 문화적 배경에 따라 다를 수 있습니다. 따라서, 삶의 의미에 대한 최종적인 답은 모른다고 말씀드릴 수밖에 없습니다.'

철학적인 질문은 철학 전문가 플라톤에게 전달되었네요.

chain.run("청년과 떠오르는 태양을 주제로 시를 써줘")

### 결과
> Entering new MultiPromptChain chain...
literature: {'input': '청년과 떠오르는 태양을 주제로 시를 써줘'}
> Finished chain.
'나는 셰익스피어가 아니지만, 당신을 위해 청년과 떠오르는 태양을 주제로 한 시를 써보겠습니다.\n\n청년의 마음은 태양과 같아\n뜨겁고 밝게 빛나는 것 같아\n그의 꿈과 희망은 무궁무진하고\n떠오르는 태양처럼 높이 떠오르는 것 같아\n\n그의 눈은 태양과 같아\n찬란하고 아름다운 것 같아\n그의 시선은 멀리 향해\n떠오르는 태양처럼 빛을 비추는 것 같아\n\n청년의 에너지는 태양과 같아\n끊임없이 흘러나오는 것 같아\n그의 열정은 불타오르고\n떠오르는 태양처럼 모두를 따뜻하게 하는 것 같아\n\n청년과 떠오르는 태양은\n새로운 시작과 희망을 상징해\n그들은 우리에게 빛과 영감을 주며\n떠오르는 태양처럼 우리를 이끌어가는 것 같아\n\n이렇게 청년과 떠오르는 태양에 대한 시를 써봤습니다. 셰익스피어의 수준은 아니지만, 조금이나마 당신의 질문에 대한 답변이 되었기를 바랍니다.'

시를 써달라고 하니 문학 Chain으로 연결되긴 했는데, LLM에서 자신은 셰익스피어가 아니라고 부인합니다. 그냥 PromptTemplate 대신 ChatPromptTemplate을 써서 시스템 메시지로 당신은 셰익스피어라고 하면 인정할까요? 연습해보세요.

chain.run("비트와 바이트는 무슨 관계지?")

### 결과
> Entering new MultiPromptChain chain...
computer: {'input': '비트와 바이트는 무슨 관계지?'}
> Finished chain.
'비트와 바이트는 컴퓨터에서 데이터를 표현하는 단위입니다. 비트는 0 또는 1의 값을 가지는 가장 작은 단위이고, 바이트는 8개의 비트로 이루어진 단위입니다. 즉, 바이트는 비트의 그룹이라고 볼 수 있습니다. 따라서, 1바이트는 8비트와 같고, 2바이트는 16비트와 같은 관계를 가지게 됩니다.'

비트와 바이트에 관한 질문은 컴퓨터 Chain에 전달되었습니다. 이렇게 RouterChain을 쓰면 자연어로 if문과 유사한 조건 분기 프로그램을 만들 수 있습니다.

LangChain: Chain들을 다양하게 연결하는 SequentialChain

앞서 살펴본 SimpleSequentialChain작은 Chain들이 한 줄로 연결된 형태였습니다.

SequentialChain은 아래와 같이 작은 Chain들을 좀 더 복잡한 형태로 연결할 수 있는 Chain입니다.

Example

예제를 살펴보겠습니다. 간단하게 만들 수도 있지만 예시를 위해 조금 복잡하게 만들었습니다. 외국어로 된 사용자 리뷰를 받아서 한글로 번역하고, 번역한 내용을 한 문장으로 요약한 다음 요약을 보고 답변을 달려고 합니다. 답변 언어는 원래 리뷰의 언어로 하고, 추가로 감정 분석을 통해 긍정/부정 점수를 매기려고 합니다. 각각의 작업에 대한 Chain들을 다음과 같이 만들어 연결하겠습니다.

  • Chain 1: 외국어 리뷰를 한글로 번역, input = review, output = translation
  • Chain 2: 한글 리뷰를 한 문장으로 요약, input = translation, output = summary
  • Chain 3: 리뷰를 읽고 감정 분석 점수 매기기, input = translation, output = sentiment_score
  • Chain 4: 리뷰의 언어 알아내기, input = review, output = language
  • Chain 5: 리뷰의 한글 요약에 대해 원래 언어로 답변 작성, input = language & summary, output = reply

LLM

코드를 봅시다. 먼저 필요한 모듈을 import하고, 공통으로 사용할 llm 변수를 생성했습니다.

from langchain.chat_models import ChatOpenAI
from langchain.prompts import PromptTemplate
from langchain.chains import LLMChain

llm = ChatOpenAI(temperature=0.5)

PromptTemplate, LLMChain

다음에는 위의 Chain 1~5에 해당하는 PromptTemplateLLMChain을 만들겠습니다.

prompt1 = PromptTemplate(
    input_variables=['review'],
    template="다음 사용자 리뷰를 한글로 번역하세요.\n\n{review}"
)
chain1 = LLMChain(llm=llm, prompt=prompt1, output_key="translation")

prompt2 = PromptTemplate.from_template(
    "다음 리뷰를 한 문장으로 요약하세요.\n\n{translation}"
)
chain2 = LLMChain(llm=llm, prompt=prompt2, output_key="summary")

prompt3 = PromptTemplate.from_template(
    "다음 리뷰를 읽고 0점부터 10점 사이에서 부정/긍정 점수를 매기세요. 숫자만 대답하세요.\n\n{translation}"
)
chain3 = LLMChain(llm=llm, prompt=prompt3, output_key="sentiment_score")

prompt4 = PromptTemplate.from_template(
    "다음 리뷰에 사용된 언어가 무엇인가요? 언어 이름만 답하세요.\n\n{review}"
)
chain4 = LLMChain(llm=llm, prompt=prompt4, output_key="language")

prompt5 = PromptTemplate.from_template(
    "다음 리뷰 요약에 대해 공손한 답변을 작성하세요.\n답변 언어:{language}\n리뷰 요약:{summary}"
)
chain5 = LLMChain(llm=llm, prompt=prompt5, output_key="reply")

PromptTemplate을 만들 때 from_template을 사용한 것도 있고 사용하지 않은 것도 있는데, 연습을 위해 섞어서 사용한 것입니다. 하나로 통일해도 괜찮습니다. LLMChain을 만들면서 output_key를 사용했습니다. 이어지는 Chain들의 PromptTemplate에서는 output_key에 지정한 변수들을 사용한 것을 볼 수 있습니다. 이렇게 앞 Chain의 출력을 다음 Chain의 입력으로 지정할 수 있습니다. 이제 이 Chain들을 연결하겠습니다.

SequentialChain

from langchain.chains import SequentialChain

all_chain = SequentialChain(
    chains=[chain1, chain2, chain3, chain4, chain5],
    input_variables=['review'],
    output_variables=['translation','summary','sentiment_score','language','reply'],
)

review를 입력하고 결과가 어떻게 나오는지 봅시다.

review="""
I'm somewhat satisfied with this product.
Considering its cost-effectiveness, it's not bad.
However, regardless of the product itself,
the shipping took too long, which was disappointing.
"""
all_chain(review)

### 결과
{'review': "\nI'm somewhat satisfied with this product.\nConsidering its cost-effectiveness, it's not bad.\nHowever, regardless of the product itself,\nthe shipping took too long, which was disappointing.\n",
 'translation': '이 제품에 대해는 어느 정도 만족한 편입니다.\n비용 대비로 생각해보면 그렇게 나쁘지 않아요.\n하지만 제품 자체와는 상관없이,\n배송이 너무 오래 걸려서 실망스러웠습니다.',
 'summary': '제품은 만족스럽지만 배송이 너무 오래 걸려 실망스러웠습니다.',
 'sentiment_score': '7',
 'language': '영어',
 'reply': 'Thank you for your feedback. We are glad to hear that you are satisfied with the product. We apologize for the disappointment caused by the delayed delivery. We will definitely take your feedback into consideration and work towards improving our shipping process. Thank you for bringing this to our attention.'}

input_variablesoutput_variables에 지정한 key들이 포함된 딕셔너리가 반환되었습니다. 각각의 key에 해당하는 value들이 prompt에 따라 원하는 결과로 나온 것을 볼 수 있습니다. 이렇게 SequentialChain을 사용하면 여러 Chain들을 다양한 방식으로 연결해 사용할 수 있습니다.

LangChain: Chain들을 차례로 연결하는 SimpleSequentialChain

LangChain의 Chain에는 몇 가지 종류가 있습니다. 앞에서 PromptTemplate, LLM, OutputParser를 연결한 LLMChain과 LLMChain에 Memory를 추가해 대화가 가능한 ConversationChain을 살펴봤습니다. (사실 LLMChain에서 ChatModels를 사용하고 Memory를 할당하면 ConversationChain과 유사합니다.)

이번에는 LLMChain들을 간단하게 연결할 수 있는 SimpleSequentialChain을 살펴보겠습니다. 아래 그림처럼 단순하게 이전 Chain의 출력을 다음 Chain의 입력으로 연결해주는 Chain입니다.

코드를 봅시다.

from langchain.chat_models import ChatOpenAI
from langchain.prompts import ChatPromptTemplate
from langchain.chains import LLMChain
from langchain.chains import SimpleSequentialChain

llm = ChatOpenAI(temperature=0.9)

prompt1 = ChatPromptTemplate.from_template(
    "{area} 분야에서 역사적으로 가장 중요한 사람은?"
)

prompt2 = ChatPromptTemplate.from_template(
    "{name}: 이 사람이 속했던 기관은?"
)

prompt3 = ChatPromptTemplate.from_template(
    "{org}: 이 기관의 주요 업적은?"
)

세 개의 Chain을 만들고 연결하기 위해 세 개의 PromptTemplate를 만들었습니다. 각각의 Chain은 위의 LLM과 PromptTemplate을 연결해 만들겠습니다.

chains = []
for prompt in [prompt1, prompt2, prompt3]:
    chains.append(LLMChain(llm=llm, prompt=prompt))

이렇게 Chain들의 리스트를 만들었습니다. SimpleSequentialChain은 이 리스트를 이용해 만듭니다.

simple_chain = SimpleSequentialChain(chains=chains, verbose=True)
simple_chain.run("중력 이론")

위에서 verbose는 중간 과정도 출력하기 위해 True로 넣었습니다. verbose=False로 놓으면(기본값) 최종 응답만 출력됩니다. 출력된 내용은 다음과 같습니다.

> Entering new SimpleSequentialChain chain...

### 첫 번째 Chain의 결과
중력 이론 분야에서 역사적으로 가장 중요한 사람은 아이작 뉴턴(Isaac Newton)입니다. 뉴턴은 17세기에 중력 이론을 개발하였으며, 그의 "형성력학"은 현대 물리학의 기초를 세우는 데 큰 영향을 주었습니다. 뉴턴의 중력 이론은 이후 약 200년 동안 가장 효과적이고 정확한 설명이었으며, 그의 업적은 고전 물리학의 기초와 현대 과학의 발전에 큰 영감을 주었습니다.

### 두 번째 Chain의 결과
아이작 뉴턴은 케임브리지 대학교에서 교수로 활동하였습니다.

### 세 번째 Chain의 결과
아이작 뉴턴은 케임브리지 대학교에서 교수로 활동하였으며, 그의 주요 업적은 다음과 같습니다:

1. 만유인력의 법칙과 중력: 뉴턴은 중력의 법칙을 제시하고 지구의 운동을 설명하는 뉴턴의 운동 법칙을 개발했습니다. 그는 또한 만유인력의 법칙을 제시하여 물체 간의 인력을 설명하였습니다.

2. 광학: 뉴턴은 광학 연구를 수행하여 "광방사"와 "광굴절"의 원리를 밝혀내었습니다. 그는 빛이 다양한 색상으로 구성되어 있다는 것을 발견하였고, 이는 후에 뉴턴의 색채 이론으로 알려지게 되었습니다.

3. 미적분학: 뉴턴은 미적분학의 기초를 개발하였습니다. 그의 연구는 운동, 탄성, 적분 등 다양한 수학적 문제들을 해결하는데 사용되었으며, 이는 현대 과학 및 공학의 핵심 개념 중 하나가 되었습니다.

4. 역학: 뉴턴의 연구는 역학의 발전에 큰 기여를 했습니다. 그는 뉴턴의 운동 법칙을 통해 물리학적 시스템의 움직임과 운동을 설명하였으며, 이를 통해 천문학, 공학, 물리학 등에서 다양한 응용분야에 사용되었습니다.

이러한 업적들은 뉴턴을 현대 과학의 선구자 중 한 명으로 여기게 되었으며, 그의 연구는 현대과학의 기반을 다지는 데 큰 역할을 한 것으로 평가되고 있습니다.

결과를 보면 질문에 대한 답만 말한 것이 아니라 부연 설명이 들어가 있습니다. 최종 응답에서는 기관의 업적이 아니라 뉴턴의 업적이 결과로 나왔네요. OutputParser를 추가하면 첫 번째 응답은 “뉴턴”, 두 번째 응답은 “케임브리지 대학교”로 만들어 세 번째에 기관의 업적이 나오도록 만들 수 있을겁니다. 해봅시다.

from langchain.output_parsers import ResponseSchema
from langchain.output_parsers import StructuredOutputParser

schema = ResponseSchema(name='name', description="json object: key=name, value=person's name")
response_schemas = [schema]
output_parser1 = StructuredOutputParser.from_response_schemas(response_schemas)

schema = ResponseSchema(name='org', description="json object: key=org, value=organization's name")
response_schemas = [schema]
output_parser2 = StructuredOutputParser.from_response_schemas(response_schemas)

첫 번째와 두 번째 LLM 출력을 위한 OutputParser들을 만들었습니다.

prompt1 = ChatPromptTemplate.from_template(
    "{area} 분야에서 역사적으로 가장 중요한 사람은?\n{format_instructions}",
    partial_variables={"format_instructions":output_parser1.get_format_instructions()}
)

prompt2 = ChatPromptTemplate.from_template(
    "{name}: 이 사람이 속했던 기관은?\n{format_instructions}",
        partial_variables={"format_instructions":output_parser2.get_format_instructions()}
)

prompt3 = ChatPromptTemplate.from_template(
    "{org}: 이 기관의 주요 업적은?"
)

첫 번째와 두 번째 프롬프트에 OutputParser의 format_instructions를 추가했습니다.

new_chains=[]
new_chains.append(LLMChain(llm=llm, prompt=prompt1, output_parser=output_parser1))
new_chains.append(LLMChain(llm=llm, prompt=prompt2, output_parser=output_parser2))
new_chains.append(LLMChain(llm=llm, prompt=prompt3))

new_simple_chain = SimpleSequentialChain(chains=new_chains, verbose=True)

new_simple_chain.run("중력 이론")

OutputParser를 추가한 LLMChain들을 이용해 SimpleSequentialChain을 만들고 실행했습니다. 결과를 보겠습니다.

> Entering new SimpleSequentialChain chain...

### 첫 번째 Chain의 결과
{'name': '아이작 뉴턴'}

### 두 번째 Chain의 결과
{'org': '옥스퍼드 대학교'}

### 세 번째 Chain의 결과
옥스퍼드 대학교는 많은 주요 업적을 가지고 있습니다. 이 중 일부는 다음과 같습니다:

1. 학문적 우수성: 옥스퍼드 대학교는 국제적으로 인정받는 세계적인 연구 및 교육 기관으로, 학문적 우수성과 혁신적인 연구로 유명합니다. 이는 다양한 분야에서 많은 세계적인 수상을 받았음을 증명하고 있습니다.

2. 역사적인 유산: 옥스퍼드 대학교는 12세기에 설립되어 역사적인 유산을 가지고 있습니다. 옥스퍼드의 대학 조직 구조는 근대 대학의 모델로 사용되었으며, 다른 대학들에 큰 영향을 미쳤습니다.

3. 알럼니 네트워크: 옥스퍼드 대학교는 강력하고 영향력 있는 알럼니 네트워크를 가지고 있습니다. 많은 옥스퍼드 졸업생들이 세계적으로 성공한 사업가, 정치인, 문화인으로 알려져 있습니다.

4. 문화적 영향력: 옥스퍼드 대학교는 창의적이고 혁신적인 사고 방식을 장려하며, 학문의 자유를 존중합니다. 이러한 문화적인 영향력이 전 세계에서 영향을 미치고 있으며, 다양한 분야에서 지식과 이해를 증진시키는 역할을 합니다.

5. 국제 협력: 옥스퍼드 대학교는 다양한 국제 협력 프로그램을 통해 세계의 다른 연구기관과 협력하고 있습니다. 이를 통해 옥스퍼드는 국제적인 역량을 키우고, 글로벌 문제에 대한 해결책을 모색하는 데 기여하고 있습니다.

첫 번째와 두 번째 Chain에서 원하는 출력 형식을 얻었으나, 두 번째 응답의 결과가 잘못 되었네요. 케임브리지 대학이 맞습니다. 이렇게 틀린 응답을 할 때가 종종 있으니 결과를 확인해볼 필요가 있습니다. 정확도가 중요할 때는 Retrieval Augmented Generation과 같은 방법을 쓰는게 좋겠죠.