태그 보관물: gpl

속도 프로파일과 탄성파 트레이스 추출하여 그리기

속도모델에서 프로파일을 추출하여 깊이에 따라 속도 그림을 그려보겠습니다. 이진 형식의 속도파일에서 텍스트 파일로 프로파일을 추출한 후 그리는 방법과 이진 속도파일을 직접 읽어서 그리는 방법을 살펴보겠습니다. 참고로, 탄성파 공통송신원모음 등에서 트레이스를 추출하여 그리는 과정 또한 동일합니다.

텍스트 파일로 추출하여 그리기

바이너리 파일에서 프로파일 또는 트레이스를 추출하기 위해 gpl 라이브러리의 gplTracePick 프로그램을 사용하겠습니다. 이차원 단면(속도모델, 공통송신원모음 등)에서 세로 방향 트레이스를 추출할 때 사용하는 프로그램입니다. (가로방향 트레이스는 gplHTracePick 프로그램을 이용하면 됩니다.) 이 프로그램을 그냥 실행하면 아래와 같은 도움말이 나옵니다.


%%sh # 이 글을 쓰고 있는 jupyter notebook에서 shell 명령을 실행하기 위한 magic command입니다.
gplTracePick # 실제 터미널상에서 실행하는 명령어

 Gpl trace picker
 Required parameters:
     [i] n1=            : # of grids in fast dimension
     [s] fin=           : input binary file
     [s] fout=          : output binary file
     [i] pick=          : (=first), first pick (1~n2)
 Optional parameters:
     [i] last=first     : last pick (pick~n2)
     [i] step=1         : pick step
     [f] d1=1.0         : grid size
     [i] n2=calc        : # of grids in slow dimension
     [s] type=f         : data type [ifdcz]
     [s] otype=a        : output type [ab] (ascii/binary)

위에서 n1finfoutpick은 프로그램 실행시 필수적으로 넣어줘야 하는 값입니다.

  • n1은 세로 방향(fast dimension) 격자수
  • fin은 입력 파일 이름
  • fout은 출력 파일 이름
  • pick은 추출하고자하는 가로 방향(slow dimension) 격자 번호입니다. 격자 번호는 1번부터 시작합니다.

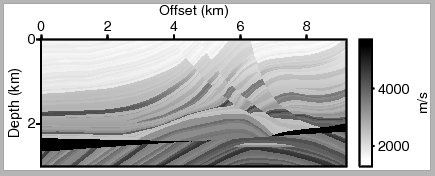
Marmousi 속도모델(nx=576, ny=188, h=0.016 km)에 대해 1.6 km 지점(격자번호 101)에서 시작하여 3.2 km 간격(200개 격자 간격)으로 3개의 속도 프로파일을 추출한다면 아래와 같이 실행할 수 있습니다.


%%sh
gplTracePick n1=188 d1=0.016 fin=marm16km.bin fout=vel_profile.txt pick=101 step=200 last=501

 n2=         576


     n1=188
     d1=0.016
     fin=marm16km.bin
     fout=vel_profile.txt
     pick=101
     step=200
     last=501

그 때 결과물은 아래와 같습니다. 첫 번째 열은 깊이 정보, 두 번째부터 네 번째 열까지는 추출한 속도 프로파일 정보입니다(1.6 km, 4.8 km, 8.0 km).

%%sh
head vel_profile.txt
   0.00000000       1.50000012       1.50000012       1.50000012    
   1.60000008E-02   1.50000012       1.50000012       1.50000012    
   3.20000015E-02   1.50000012       1.65800011       1.59800005    
   4.80000004E-02   1.66200006       1.66200006       1.60200012    
   6.40000030E-02   1.66600013       1.66600013       1.60600019    
   8.00000057E-02   1.67000008       1.73999715       1.69000006    
   9.60000008E-02   1.67400002       1.74399781       1.69400012    
  0.112000003       1.67800009       1.61800003       1.69800007    
  0.128000006       1.78200006       1.70200002       1.63200009    
  0.144000009       1.78600013       1.70600009       1.63600004    

텍스트 파일로 추출한 결과는 gnuplot과 같은 프로그램을 이용해 빠르게 확인해볼 수 있습니다. 여기서는 파이썬의 Matplotlib을 이용하여 위의 속도 프로파일을 그려보겠습니다.


%matplotlib inline
import matplotlib.pyplot as plt
import numpy as np

trc=np.loadtxt("vel_profile.txt")

h=0.016
fs='large'

plt.figure(figsize=[15,5])
for i,ix in enumerate([100,300,500]):
    plt.plot(trc[:,0],trc[:,i+1],label="{0} km".format(ix*h))

plt.legend(loc="upper left",fontsize=fs)
plt.xlabel("Depth (km)",fontsize=fs)
plt.ylabel("Velocity (km/s)",fontsize=fs)

<matplotlib.text.Text at 0x10cc66c88>

png

이진 파일을 직접 읽어서 그리기

이번에는 파이썬에서 이진 형식의 속도모델 파일을 직접 읽어서 그려보겠습니다.


nx=576
ny=188
vel=np.fromfile("marm16km.bin",dtype=np.float32)
vel.shape=(nx,ny)

h=0.016
fs='large'
depth=np.arange(ny)*h

plt.figure(figsize=[15,5])
for ix in [100,300,500]:
    plt.plot(depth,vel[ix,:],label="{0} km".format(ix*h))

plt.legend(loc="upper left",fontsize=fs)
plt.xlabel("Depth (km)",fontsize=fs)
plt.ylabel("Velocity (km/s)",fontsize=fs)

<matplotlib.text.Text at 0x10d13dd30>

png

참고로, 파이썬은 배열 인덱스가 0번부터 시작하기 때문에 가로방향 100, 300, 500번 속도 프로파일을 가져다가 그렸습니다(gplTracePick을 이용하는 앞의 예제에서는 101, 301, 501번 격자 위치에서 추출했죠).

탄성파 트레이스 그리기

공통송신원모음에서 탄성파 트레이스를 추출하여 그리는 과정은 속도모델에서 프로파일을 추출하여 그리는 경우와 동일합니다. 아래는 샘플 개수가 723개, 샘플링 간격 4 ms, 트레이스가 96개인 공통송신원모음 파일(marm3000.bin)에서 31번째와 61번째 트레이스를 그리는 예제입니다.


ntr=96
ns=723
dt=0.004
trc=np.fromfile("marm3000.bin",dtype=np.float32)
trc.shape=(ntr,ns)

fs='large'
time=np.arange(ns)*dt

plt.figure(figsize=[15,5])
for itr in [30,60]:
    plt.plot(time,trc[itr,:],label="trace {0}".format(itr+1))
plt.legend(loc="upper left",fontsize=fs)
plt.xlabel("Time (s)",fontsize=fs)
plt.ylabel("Amplitude",fontsize=fs)
plt.xlim([0,ns*dt])

(0, 2.892)

png

속도모델 그림 그리기

두 가지 방법으로 2차원 속도모델을 그려보겠습니다. 첫 번째 방법은 SU의 psimage를 이용하는 방법, 두 번째는 python의 matplotlib을 이용하는 방법입니다.

psimage로 그리기

첫 번째 방법부터 보겠습니다. psimage는 쉘에서 사용하는 명령어이지만, gpl 라이브러리의 psplot 모듈을 이용하면 python 명령을 통해 간편하게 속도모델을 그릴 수 있습니다. Marmousi 속도모델을 그림으로 그려보겠습니다.


from gpl.psplot import plot

nx=576
ny=188
h=0.016
fin="marm16km.drt"

opt = "n1={0} d1={1} d2={1} d1num=1 lbeg=1.5 lend=5.5".format(ny,h,h)
plot.velocity("marm16km.png", fin, opt)

psimage label1="Depth (km)" legend=1 d2s=0.5 lheight=1.0 lstyle="vertright" label2="Distance (km)" height=1.0 labelsize=8 lwidth=0.1 d1s=0.5 width=2.65  n1=188 d1=0.016 d2=0.016 d1num=1 lbeg=1.5 lend=5.5 < marm16km.drt > marm16km.eps

// adding velocity unit (km/s)

// fixing bounding box

// converting .eps to .png ..

vel(marm16km.png)

velocity_color를 이용해 컬러로 그릴 수도 있습니다.


plot.velocity_color("marm16km_color.png",fin,opt)

psimage label1="Depth (km)" ghls="0.33,0.5,1" bps=24 bhls="0.67,0.5,1" d1s=0.5 lwidth=0.1 whls="0,0.5,1" legend=1 d2s=0.5 lheight=1.0 lstyle="vertright" label2="Distance (km)" height=1.0 labelsize=8 width=2.65  n1=188 d1=0.016 d2=0.016 d1num=1 lbeg=1.5 lend=5.5 < marm16km.drt > marm16km_color.eps

// adding velocity unit (km/s)

// fixing bounding box

// converting .eps to .png ..

vel(marm16km_color.png)

Matplotlib으로 그리기

두 번째 방법은 python의 matplotlib 라이브러리를 이용하는 방법입니다. 이를 위해서는 코드에서 numpy를 이용해 속도모델을 읽어들인 후에 matplotlib으로 그립니다. 속도모델을 그리는 부분은 함수로 작성하였는데, 필요에 따라 수정해서 사용하면 되겠습니다.


%matplotlib inline
import matplotlib.pyplot as plt
import numpy as np

def plot_vel(vel, h, figsize=[15,4], unit='km/s', xticks=None, yticks=None, cticks=None, cmap='gray_r', fontsize=20):
    xmax=(vel.shape[0]-1)*h
    ymax=(vel.shape[1]-1)*h

    plt.figure(figsize=figsize)
    plt.imshow(vel.transpose(),extent=(0,xmax,ymax,0),cmap=cmap)

    # x,y labels
    plt.xlabel('Distance (km)',fontsize=fontsize)
    plt.ylabel('Depth (km)',fontsize=fontsize)

    # x,y ticks, tick labels
    plt.tick_params(labelsize=fontsize)
    plt.gca().xaxis.tick_top()
    plt.gca().xaxis.set_label_position("top")
    xticks and plt.xticks(xticks)
    yticks and plt.yticks(yticks)

    # colorbar
    cb=plt.colorbar(shrink=1.0,pad=0.01,aspect=10,ticks=cticks)
    plt.clim([vel.min(),vel.max()])
    cb.set_label(unit,fontsize=fontsize)
    ct=plt.getp(cb.ax,'ymajorticklabels')
    plt.setp(ct,fontsize=fontsize)

# 속도모델 읽기
vel=np.fromfile(fin,dtype=np.float32)
vel.shape=(nx,ny)

yticks=[0,1,2] # y축 ticks
cticks=[2,3,4,5] # colorbar ticks
plot_vel(vel,h,yticks=yticks,cticks=cticks)

png

# 컬러로 그리고(cmap='jet') 파일로 저장하기
plot_vel(vel,h,xticks=[0,3,6,9],cmap='jet')
plt.savefig("vel.png",bbox_inches='tight')

png

결과물로 저장한 vel.png 파일은 다음과 같습니다.

vel(vel.png)

탄성파 자료처리 그림 그리기

탄성파 자료처리 결과 그림을 쉽게 그리는 방법을 살펴보겠습니다.

탄성파 자료처리를 하다 보면 결과물을 그림으로 확인해야 하는 경우가 많습니다. 특별히 노력해서 그려야 하는 그림도 있지만 속도모델, 공통송신원모음 등 대부분의 그림은 거의 비슷한 명령으로 그릴 수 있습니다. 개인적으로 논문이나 발표자료에 넣을 그림을 그릴 때 Seismic Un*x(SU)를 많이 이용하는데, 몇 가지 자주 그리는 그림들을 쉽게 그릴 수 있도록 파이썬 모듈을 만들었습니다. 모듈은 gpl라이브러리에 포함되어 있습니다. 최근 python 3 용으로 수정하였습니다.

먼저 속도모델을 예로 들어보겠습니다. 그림을 그리기 위한 코드는 다음과 같습니다.


from gpl.psplot import plot

vel="marm16km.drt"
opt="n1=188 d1=0.016 d2=0.016 d1num=1 d2num=2"

plot.velocity_color("vel_color.png",vel,opt)

위 코드는 gpl.psplot 모듈에서 plot을 가져오고, marm16km.drt 파일로부터 opt 문자열의 옵션을 이용하여 vel_color.png 파일을 생성하는데, 컬러로 된 속도모델 그림으로 만들라는 코드입니다.

velocity_color는 그림 종류를 지정하는 명령인데, 현재 다음과 같은 명령들을 지원합니다.

  • velocity(target, source, option, unit=”km/s”)
  • velocity_color(target, source, option, unit=”km/s”)
  • gradient(target, source, option)
  • gradient_color(target, source, option)
  • migration(target, source, option)
  • contour(target, source, option)
  • seismogram(target, source, option)
  • spectrum(target, source, option)

위의 명령들은 SU를 이용해 해당 그림을 그리라는 명령으로, contourpscontour를 사용하고 나머지는 psimage를 사용합니다. 입력 파일이 SU 파일이라면 supscontour 또는 supsimage를 사용합니다.

인자들 중 target은 출력 파일, source는 입력 파일, option은 그림 그릴 때 사용할 옵션입니다. 그림 종류에 따라 기본적으로 몇 가지 옵션이 들어가있는데, n1, d1, d2와 같이 입력 파일에 따라 달라지는 옵션을 option에 넣어주면 됩니다. 그리고 기본 옵션을 덮어쓰고 싶은 경우에도 option에 추가해줍니다.

속도모델의 단위는 기본적으로 km/s로 지정해 놓았는데, 필요에 따라 바꿔서 사용할 수 있습니다. g/cc로 바꾸면 밀도 모델을 그릴 수도 있겠죠. migration은 snapshot을 그릴 때 사용할 수도 있습니다.

SU 명령은 기본적으로 eps 파일을 생성합니다. target을 eps 외의 다른 파일(png, tiff, jpg 등)로 지정하면ImageMagickconvert 명령을 이용해 eps 파일을 변환합니다.

따라서 본 모듈의 모든 기능을 이용하려면 Python, SU, ImageMagick이 필요합니다.

터미널에서 위의 코드를 실행했을 때 나오는 메시지는 다음과 같습니다.

psimage height=1.0 width=2.65 d2s=0.5 lwidth=0.1 lstyle="vertright" lheight=1.0
label2="Distance (km)" ghls="0.33,0.5,1" bps=24 whls="0,0.5,1" legend=1
bhls="0.67,0.5,1" labelsize=8 label1="Depth (km)" d1s=0.5  n1=188 d1=0.016
d2=0.016 d1num=1 d2num=2 < marm16km.drt > vel_color.eps

psimage: bclip=5.5 wclip=1.5

// adding velocity unit (km/s)

// fixing bounding box
Original:  %%BoundingBox: 66 41 353 207
Updated:   %%BoundingBox: 85 104 324 202

// converting .eps to .png ..

내용을 살펴보면 다음 순서로 실행됩니다.

  1. SU의 psimage 명령을 이용해 속도모델 eps 파일을 생성합니다. 옵션은 컬러 속도모델에 맞춰서 들어갑니다. 참고로, 그림 크기는 Geophysics 논문 기준에 맞춘 것입니다.
  2. km/s라는 단위를 넣어줍니다(postscript 수정).
  3. 그림 여백을 조절합니다(bounding box 수정).
  4. eps 파일을 png 파일로 수정합니다.

그리고, 결과물인 vel_color.png은 다음과 같습니다. output(vel_color.png)

아래 코드와 다른 그림 예시를 올리니 필요한 그림에 해당하는 명령을 사용하시면 되겠습니다.


from gpl.psplot import plot

vel="marm16km.drt"
opt="n1=188 d1=0.016 d2=0.016 d1num=1 d2num=2"

plot.velocity("vel.png",vel,opt+"lbeg=1.5 lend=5.5 lfnum=1.5")
plot.velocity_color("vel_color.png",vel,opt)
plot.velocity_color("density_color.png",vel,opt,unit="g/cc")
plot.gradient("grad.png",vel,opt)
plot.gradient_color("grad_color.png",vel,opt)
plot.migration("mig.png",vel,opt)
plot.contour("contour.png",vel,opt)

seismo="marm3000.su"
opt2="f2=0 d2=0.025 d1s=0.5 d2s=0.5"
plot.seismogram("seismo.png",seismo,opt2)

spec="marm3000fx.su"
plot.spectrum("spec.png",spec,opt2)

output(vel.png)

output(vel_color.png)

output(density_color.png)

output(grad.png)

output(grad_color.png)

output(mig.png)

output(contour.png)

output(seismo.png)

output(spec.png)

Fortran option parser

gpl에서 사용하기 위해 개발한 포트란 option parser를 소개합니다. Option parser는 command line option들을 분석해서 프로그램에서 사용할 수 있도록 변수로 저장해주는 역할을 합니다. 리눅스나 맥에서 명령을 실행할 때

$ gcc -c -o main.e main.c
$ tar -zxvf file.tgz

와 같은 유닉스 표준 형태의 옵션이 있고,

$ suximage n1=101 d1=0.5 perc=99 < file.su

와 같이 Seismic Un*xMadagascar 등에서 사용하는 형태의 옵션도 있는데, 지금 소개해드리는 option parser는 두 번째 형태의 옵션을 지원합니다. Option parser는 한 번 작성한 프로그램의 재사용을 위해 매우 유용한 기능입니다. 우선 테스트 프로그램을 통해 사용 예를 살펴본 후 자세한 사용법을 보겠습니다.

테스트 프로그램

다음의 테스트 프로그램은 다양한 종류의 변수를 command line option으로부터 읽어서 출력하는 프로그램입니다.
지원하는 자료형은 integer, single precision real, double precision real, logical, character입니다(complex는 아직까지 필요가 없어서 안 넣었습니다). 단일 변수 뿐 아니라 각각의 배열도 지원합니다. 필수 입력 옵션과 기본값을 가진 옵션을 구분하여, 필수 입력 옵션들 중 하나라도 command line option에 없을 경우 도움말을 출력하고 프로그램을 종료합니다.

        program test_optparse
        use gpl_optparse
        implicit none
        integer,parameter:: mxlen=100,mxstr=100
        integer:: i,io,ia(mxlen)
        integer:: j,ni,nf,nb,nd,ns
        real:: f,fo,fa(mxlen)
        logical:: b,bo,ba(mxlen)
        real(kind=8):: d,d_o,da(mxlen)
        character(len=mxstr) :: s,so,sa(mxlen)

        ! required parameters
        call from_par('i',i,'integer number')
        call from_par('f',f,'float: single precision real number')
        call from_par('d',d,'double precision')
        call from_par('b',b,'boolean/logical')
        call from_par('s',s,'string')

        ! optional parameters
        call from_par('io',io,1,'1','optional integer')
        call from_par('fo',fo,1.0,'1.0','optional float')
        call from_par('do',d_o,1.0d0,'1.0d0','optional double')
        call from_par('bo',bo,.true.,'T','optional boolean')
        call from_par('so',so,'','empty','optional string')

        ! array, required parameters
        call from_par('ia',ia,ni,'integer array')
        call from_par('fa',fa,nf,'float array')
        call from_par('da',da,nd,'double array')
        call from_par('ba',ba,nb,'boolean array')
        call from_par('sa',sa,ns,'string array')

        call help_par()
        !call report_par()
        
        print*,'i=',i
        print*,'f=',f
        print*,'d=',d
        print*,'b=',b
        print*,'s=',trim(s)
        print*,''
        print*,'ia=',ia(1:ni)
        print*,'fa=',fa(1:nf)
        print*,'ba=',ba(1:nb)
        print*,'da=',da(1:nd)
        print*,'sa=',(trim(sa(j))//'_',j=1,ns)
        print*,''
        print*,'io=',io
        print*,'fo=',fo
        print*,'do=',d_o
        print*,'bo=',bo
        print*,'so=',so
        end program

실행 결과

위의 프로그램을 컴파일하여 아래와 같이 실행하면 변수들이 제대로 입력된 것을 확인할 수 있습니다. 문자열의 경우 문자열을 둘러싼 따옴표는 제거하고 변수에 저장합니다. 배열은 쉼표를 기준으로 배열의 원소를 나눕니다. 기본값을 가지고 있는 변수의 경우 command line option에 있으면 주어진 값을 저장하고 없으면 기본값을 저장합니다.

$ ./test_optparse s=test.dat i=2 f=2.5 d=3.0 b=T ia=1,2,3,4 fa=1.0,2.0,3.0,4.0 da=1.,2.,3. ba=T,F,T sa=st,'ri',"ng" io=5 so="gpl"
 i=           2
 f=   2.50000000    
 d=   3.0000000000000000     
 b= T
 s=test.dat
 
 ia=           1           2           3           4
 fa=   1.00000000       2.00000000       3.00000000       4.00000000    
 ba= T F T
 da=   1.0000000000000000        2.0000000000000000        3.0000000000000000     
 sa=st_ri_ng_
 
 io=           5
 fo=   1.00000000    
 do=   1.0000000000000000     
 bo= T
 so=gpl

만약 기본값이 없는 필수 옵션 중 하나라도 command line option에 빠져있다면 다음과 같이 도움말을 표시하고 프로그램을 종료합니다.

$ ./test_optparse 
 Required parameters:
     [i] i=             : integer number
     [f] f=             : float: single precision real number
     [d] d=             : double precision
     [b] b=             : boolean/logical
     [s] s=             : string
     [I] ia=            : integer array
     [F] fa=            : float array
     [D] da=            : double array
     [B] ba=            : boolean array
     [S] sa=            : string array
 Optional parameters:
     [i] io=1           : optional integer
     [f] fo=1.0         : optional float
     [d] do=1.0d0       : optional double
     [b] bo=T           : optional boolean
     [s] so=empty       : optional string

위의 도움말에서 i=integer, f=real, d=real(kind=8), b=logical, s=character(len=?)을 의미하고, 각각의 대문자는 배열을 의미합니다.

사용법

그럼 실제 모듈의 사용법을 알아보겠습니다. 모듈은 use gpl_optparse 또는 간편하게 use gpl로 불러올 수 있습니다. 가장 중요한 from_par 서브루틴은 다음과 같이 세 가지 방식으로 사용할 수 있습니다.

call from_par('parname',variable,'help message') !! 필수 옵션
call from_par('parname',variable_arr,len_arr,'help message') !! 필수 배열
call from_par('parname',variable,default,'default message','help message') !! 기본값이 있는 변수

Command line option은 parname=value 형태로 입력 받게 됩니다. 위의 서브루틴들에서 'parname'은 이 때 사용되는 이름이고, valuevariable에 저장됩니다. ’help message’는 도움말 출력시 보여주는 변수 설명입니다.

배열의 경우 parname=value1,value2,value3과 같은 형태로 입력받고, 입력받은 값은 variable_arr에 저장됩니다. 이 때 입력받은 원소는 len_arr 개입니다.

기본값이 있는 변수의 경우 default는 기본값이고, 'default message'는 도움말 출력시 기본값을 보여주기 위한 문자열입니다.

함수 오버로딩을 사용하였기 때문에 정수, 실수 등의 자료형에 상관없이 위의 서브루틴들을 이용할 수 있습니다.

기타 사용할 수 있는 서브루틴들과 함수는 다음과 같습니다.

call help_par()
call help_header('msg before the parameter help msg')
call help_footer('msg after the parameter help msg')
call force_help()

call report_par()

if(given_par('parname')) call do_something()
call from_parfile('parfile.txt')

에서 help_par는 도움말 출력을 위한 서브루틴입니다. 도움말과 관련된 서브루틴들로는 도움말을 보강하기 위한 call help_header('msg'), call help_footer('msg'), 필수 옵션이 주어졌는지와 무관하게 도움말을 출력하기 위한 call force_help()가 있습니다. report_par는 입력받은 변수들을 출력해서 확인하기 위한 서브루틴입니다. 이 외에도 옵션이 주어졌는지 확인하기 위한 logical function given_par('parname') 함수, 옵션들을 저장해놓은 텍스트파일로부터 옵션들을 읽어들이기 위한 call from_parfile('parfile.txt')와 같은 명령이 있습니다.

참고로, command line option에 par=parfile.txt와 같은 옵션이 있으면 parfile.txt에서 먼저 변수를 읽은 후 command line option을 읽습니다. parfile.txt에 주어진 변수가 command line option에 다시 나오면 command line에 주어진 값을 사용합니다.

gpl_optparse 모듈의 소스코드는 gplGitHub에서 받으실 수 있습니다.

Polymorphic Fortran & C

포트란 함수 오버로딩과 중복

앞서 포트란 함수 오버로딩에 관한 글을 올렸습니다. 포트란 모듈과 인터페이스를 이용하면 서로 다른 자료형을 인자로 받는 함수나 서브루틴이라도 같은 이름으로 사용할 수가 있었습니다. 그런데, 동적 자료형을 지원하는 언어와 달리, 포트란에서는 자료형별로 서브루틴들을 따로 만든 후에 같은 이름으로 호출하였습니다. 동적 자료형 언어에서는 함수 자체를 한 번만 작성하면 되지요. 여기에서 포트란 코드 작성에 중복이 발생하게 됩니다. 이러한 중복을 제거하기 위해 파이썬으로 만든 스크립트가 polyfc (Polymorphic Fortran & C)입니다. 예전에 Forpedo에서 아이디어를 얻었는데, Forpedo를 사용하려니 좀 복잡해서 Python 연습도 할 겸 gpl용으로 만들었습니다.

예제

이해하기 쉽게 예제를 살펴보겠습니다. 배열의 내용을 출력하는 서브루틴을 작성하려고 합니다. 배열은 integer, real, real(kind=8), complex, complex(kind=8) 다섯 종류의 자료형을 지원하려고 합니다. 그럼 서브루틴을 자료형에 따라 총 5개를 작성해야 하는데, 선언부만 다르고 나머지는 동일하거나 거의 비슷하게 됩니다. 그래서 일종의 템플릿 서브루틴을 만들고, 필요한 부분만 바꿔가며 서브루틴을 복제하려고 합니다. 그러면 거의 비슷한 코드를 중복해서 작성하는 수고를 덜 수 있겠죠. 아래는 polyfc에 입력으로 들어가는 템플릿 파일입니다.

module polyfc_example

!@interface print_array
contains
!@template print_array ifdcz
    subroutine print_array_<name>(arr)
    <type>,intent(in):: arr(:)
    integer i
    do i=1,size(arr)
        print*, i, arr(i)
    enddo
    end subroutine
!@end
end module

포트란 주석을 이용하여 인터페이스가 들어갈 부분과 템플릿 부분을 표시하고, 자료형에 따라 바뀌어야 하는 부분은 <name>, <type>으로 표시하였습니다. 이 외에 필요할 경우 <kind><esize>도 지원합니다. 바뀌며 들어가는 부분은 다음 표를 보면 알 수 있습니다.

Name Fortran type C type Fotran kind esize
i integer int (kind=4) 4
f real float (kind=4) 4
d real(kind=8) double (kind=8) 8
c complex float complex (kind=4) 8
z complex(kind=8) double complex (kind=8) 16
b logical (not supported) (kind=4) 4
s character(len=*) char (len=*) 1

그래서 polyfc input.f90 > output.f90과 같이 실행했을 때 얻게 되는 파일은 다음과 같습니다.

! This file was generated from pfc.example.f90 by Polyfc at Mon Jul 28 22:12:32 2014.
! Do not edit this file directly.

module polyfc_example

    interface print_array
        module procedure print_array_i
        module procedure print_array_f
        module procedure print_array_d
        module procedure print_array_c
        module procedure print_array_z
    end interface print_array

contains

    subroutine print_array_i(arr)
    integer,intent(in):: arr(:)
    integer i
    do i=1,size(arr)
        print*, i, arr(i)
    enddo
    end subroutine
 
    subroutine print_array_f(arr)
    real,intent(in):: arr(:)
    integer i
    do i=1,size(arr)
        print*, i, arr(i)
    enddo
    end subroutine
 
    subroutine print_array_d(arr)
    real(kind=8),intent(in):: arr(:)
    integer i
    do i=1,size(arr)
        print*, i, arr(i)
    enddo
    end subroutine
 
    subroutine print_array_c(arr)
    complex,intent(in):: arr(:)
    integer i
    do i=1,size(arr)
        print*, i, arr(i)
    enddo
    end subroutine
 
    subroutine print_array_z(arr)
    complex(kind=8),intent(in):: arr(:)
    integer i
    do i=1,size(arr)
        print*, i, arr(i)
    enddo
    end subroutine
 
end module

자동으로 작성하면 손으로 복사했을 경우 생길 수 있는 오류도 피할 수 있겠죠. 단, 코드에 버그가 있을 때에는 output 파일에서 버그가 있는 곳을 찾아 input 파일의 해당 위치를 고쳐줘야 합니다.

참고로, polyfc 이름이 의미하듯, C도 지원합니다. 단, C에서는 <name><type>만 지원합니다. 물론 인터페이스도 지원하지 않습니다. C에서는 아래와 같은 방식으로 사용 가능합니다.

//@template ifdczbs
void abc_<name>(<type> def)
{
    ...
}
//@end

GNU Quick Plot (gnuqp)

Gnuplot은 리눅스에서 텍스트파일에 저장된 값을 빠르게 그림으로 그려주는 프로그램입니다. 다양한 기능을 가지고 있지만, 제 경우에는 주로 수치해석 후 결과 확인용으로 씁니다.
gnuplot으로 그림을 그릴 때에는 command line 상에서 gnuplot이라고 치고 들어가서 gnuplot 명령어들을 이용하여 그림을 그리고 q를 입력하여 빠져나옵니다.
그런데 간단히 결과를 확인해보기 위해서 gnuplot에 들어가서

p 'file1' w l,'file1' u 1:3 w l,'file1' u 1:4 w p

또는

set grid
set xrange[:10]
set log y
p 'file1' w l,'file2' w l,'file3' w l

과 같이 매번 치려니 귀찮다는 생각이 들었습니다. 그래서 gnuqp (GNU Quick Plot)를 만들었습니다. 이 script를 사용하면 command line 상에서 바로 gnuplot 명령어를 사용하여 그림을 그릴 수 있습니다. 사용 방법은 아래와 같습니다.

Usage :
gnuqp [options] filename1 [u 1:2] [w l], filename2 [u 1:2] [w l], filename3 ...

실행파일 이름, 몇 가지 setting 관련 옵션들, 이후에는 gnuplot의 plot 명령어를 입력합니다.

Required parameters :
filename1
Empty filename[2,3,...] will be replaced by the filename1

두 번째 위치부터는 파일명을 생략하면 첫 번째 파일명으로 대체합니다. 하나의 파일에서 여러 column들을 그릴 때 편리합니다.

Optional parameters :
u 1:2   : columns you want to plot
w [lp..]: line style- line, point, dot or impulse ..etc (default: w l)

plot 명령어의 옵션들 중에는 using (columns)과 with (line style)만 지원합니다. 그 외의 명령은 제가 잘 안 써서요^^.
위의 옵션을 주지 않았을 때 기본적으로 with line 옵션으로 그립니다.

-p      : do not run gnuplot. just print the gnuplot command
-c      : no comma seperation - the arguments are filenames seperated with a blank- use with glob pattern
-l       : set logscale y
-g      : set grid
-x[:10] : set xrange [:10]
-y[1:5] : set yrange [1:5]

위의 옵션들은 gnuplot의 setting을 간편하게 하기 위해 만들었습니다.

-p 옵션을 붙이면 gnuplot의 명령어만 출력하고 그림은 안 그립니다.

-c 옵션을 붙이면 파일들을 기본 옵션(with line)으로 그립니다. 이 때 파일명들 사이의 “,”를 생략하고 파일명만 씁니다. command line상에서 glob pattern을 이용하여 여러 그림을 그릴 수 있도록 하기 위한 옵션입니다. 예를 들면, 다음과 같은 경우죠.

./gnuqp.py -p -c file.00*
-> p 'file.0010' w l,'file.0020' w l,'file.0030' w l,'file.0040' w l,'file.0050' w l

나머지 gnuplot setting들은 위의 설명으로 충분할 것이라 생각합니다.
앞에 예를 들었던 명령어들을 gnuqp를 이용하여 실행한다면 다음과 같습니다.

(gnuplot)
p 'file1' w l,'file1' u 1:3 w l,'file1' u 1:4 w p
(q)

gnuqp file1, u 1:3, u 1:4 wp,

(gnuplot)
set grid
set xrange[:10]
set log y
p 'file1' w l,'file2' w l,'file3' w l
(q)

gnuqp file1, file2, file3 -g -l -x[:10]와 같이 실행할 수 있습니다. gnuqp는 gpl에 포함되어 있습니다.

Unit number 자동 할당

포트란에서 파일을 열 때 파일에 번호(Logical unit number)를 할당하고 그 번호를 이용하여 파일 내용을 읽거나 파일에 출력을 하게 됩니다. 리눅스에서 다음 세 번호는 기본적으로 할당이 되어(입출력 스트림이 열려) 있습니다.

0: stderr
5: stdin
6: stdout

나머지 4바이트 정수 자료형으로 표현할 수 있는 양의 정수값은 사용자가 파일에 할당하여 사용할 수 있습니다 (컴파일러마다 범위는 차이가 있습니다). 보통은 사용하는데 문제가 없지만 하나의 프로그램에서 여러 개의 파일을 열 경우 앞에서 다른 파일에 할당하여 사용중인 번호를 피해 새로운 번호를 찾아야 합니다. 사용중인 번호를 피하기 위해 앞의 코드를 살펴본다든지, 파일 입출력 서브루틴을 위해 새로운 번호를 전달해줄 경우 귀찮다는 생각이 들게 됩니다. 예를 들면 다음과 같은 경우죠.

subroutine write_a_number(un, filename, n)
integer,intent(in):: un, n
character(len=*),intent(in):: filename
open(un,file=trim(filename))
write(un,*) n
close(un)
end subroutine

이럴 때 inquire함수를 사용하면 특정 번호가 사용중인지 알 수 있고, 따라서 새로운 번호도 자동으로 찾을 수 있습니다. 아래 서브루틴과 함수는 gpl의 포트란 모듈(module_base)에서 복사하였습니다. 파일 번호는 99번부터 10번까지만 사용하게 만들었습니다. 동시에 그 이상의 파일을 열 일은 없다고 생각하고 만들었는데, 많은 파일을 열어야 할 경우 do loop 범위를 조정하면 되겠습니다.

subroutine assign_un(un)
integer, intent(out) :: un
logical :: oflag
integer :: i
do i=99,10,-1
    inquire(unit=i,opened=oflag)
    if(.not.oflag) then
        un=i
        return
    endif
enddo
stop "Error: Logical unit assignment"
end subroutine

logical function un_opened(un) result(val)
integer,intent(in):: un
inquire(unit=un,opened=val)
end function

위의 서브루틴을 사용하면 앞에서 살펴본 write_a_number 서브루틴을 다음과 같이 고칠 수 있습니다. 서브루틴의 인터페이스가 좀 더 간단해졌고, 앞으로는 서브루틴을 사용할 때 파일 번호에 대해 고민할 필요가 없겠죠. 자동화의 간단한 예가 되겠습니다.

subroutine write_a_number_new(filename, n)
integer,intent(in):: n
character(len=*),intent(in):: filename
integer:: un
call assign_un(un)
open(un,file=trim(filename))
write(un,*) n
close(un)
end subroutine

Geophysical Prospecting Library

GPL (Geophysical Prospecting Library)

이 라이브러리는 제가 개인적으로, 대부분 직접 작성하여 사용하는 프로그램들이나 스크립트들을 모아놓은 라이브러리입니다. 연구를 위해 실용적으로 사용하는 잡동사니들의 모음으로, 반복되는 작업들을 자동화하는데 초점을 맞추고 작성한 라이브러리입니다. 내용은 수치해석 프로그래밍을 편리하게 하기 위한 포트란 모듈과 C 함수들, 컴파일을 쉽게 하기 위한 스크립트, 파일 수정 및 부분 추출 등을 위한 프로그램들, 결과 확인 및 논문 그림 그리기를 위한 스크립트들 등이 있습니다. 주로 포트란으로 작성하였고, 그 외에 프로그래밍 연습도 할 겸 C, 파이썬, 루비 등의 언어를 사용하였습니다.

라이브러리 정리 및 간단한 문서화를 위해 블로그를 통해 라이브러리의 기능을 하나 둘씩 공개하려고 합니다. 홈페이지를 방문해주신 누군가에게 도움이 되기를 바랍니다. 코드는 GitHub를 통해 공개하겠습니다.

설치 방법

설치 전에

gpl을 제대로 사용하기 위해서는 Fortran 및 C 컴파일러가 필요하고, Python (2.7)과 Ruby (1.9) 인터프리터가 필요합니다. 모든 gpl 기능을 원활히 사용하기 위해서는 탄성파 자료처리 패키지인 Seismic Un*xMadagascar, Python의 NumpyMatplotlib 라이브러리, SConstruct 그리고 GnuplotImageMagick이 필요합니다.

설치

1. GitHub에서 파일을 받습니다.
2. path_to_gpl/gpl/compiler.py에서 Fortran과 C compiler 관련 설정을 해줍니다.
3. make install을 실행합니다.
4. ~/.bash_profile (Mac에서는 ~/.profile)에 path_to_gpl/etc/env.sh의 내용을 추가해줍니다.